Monday, November 14, 2022

Total Lunar Eclipse from Florida Keys


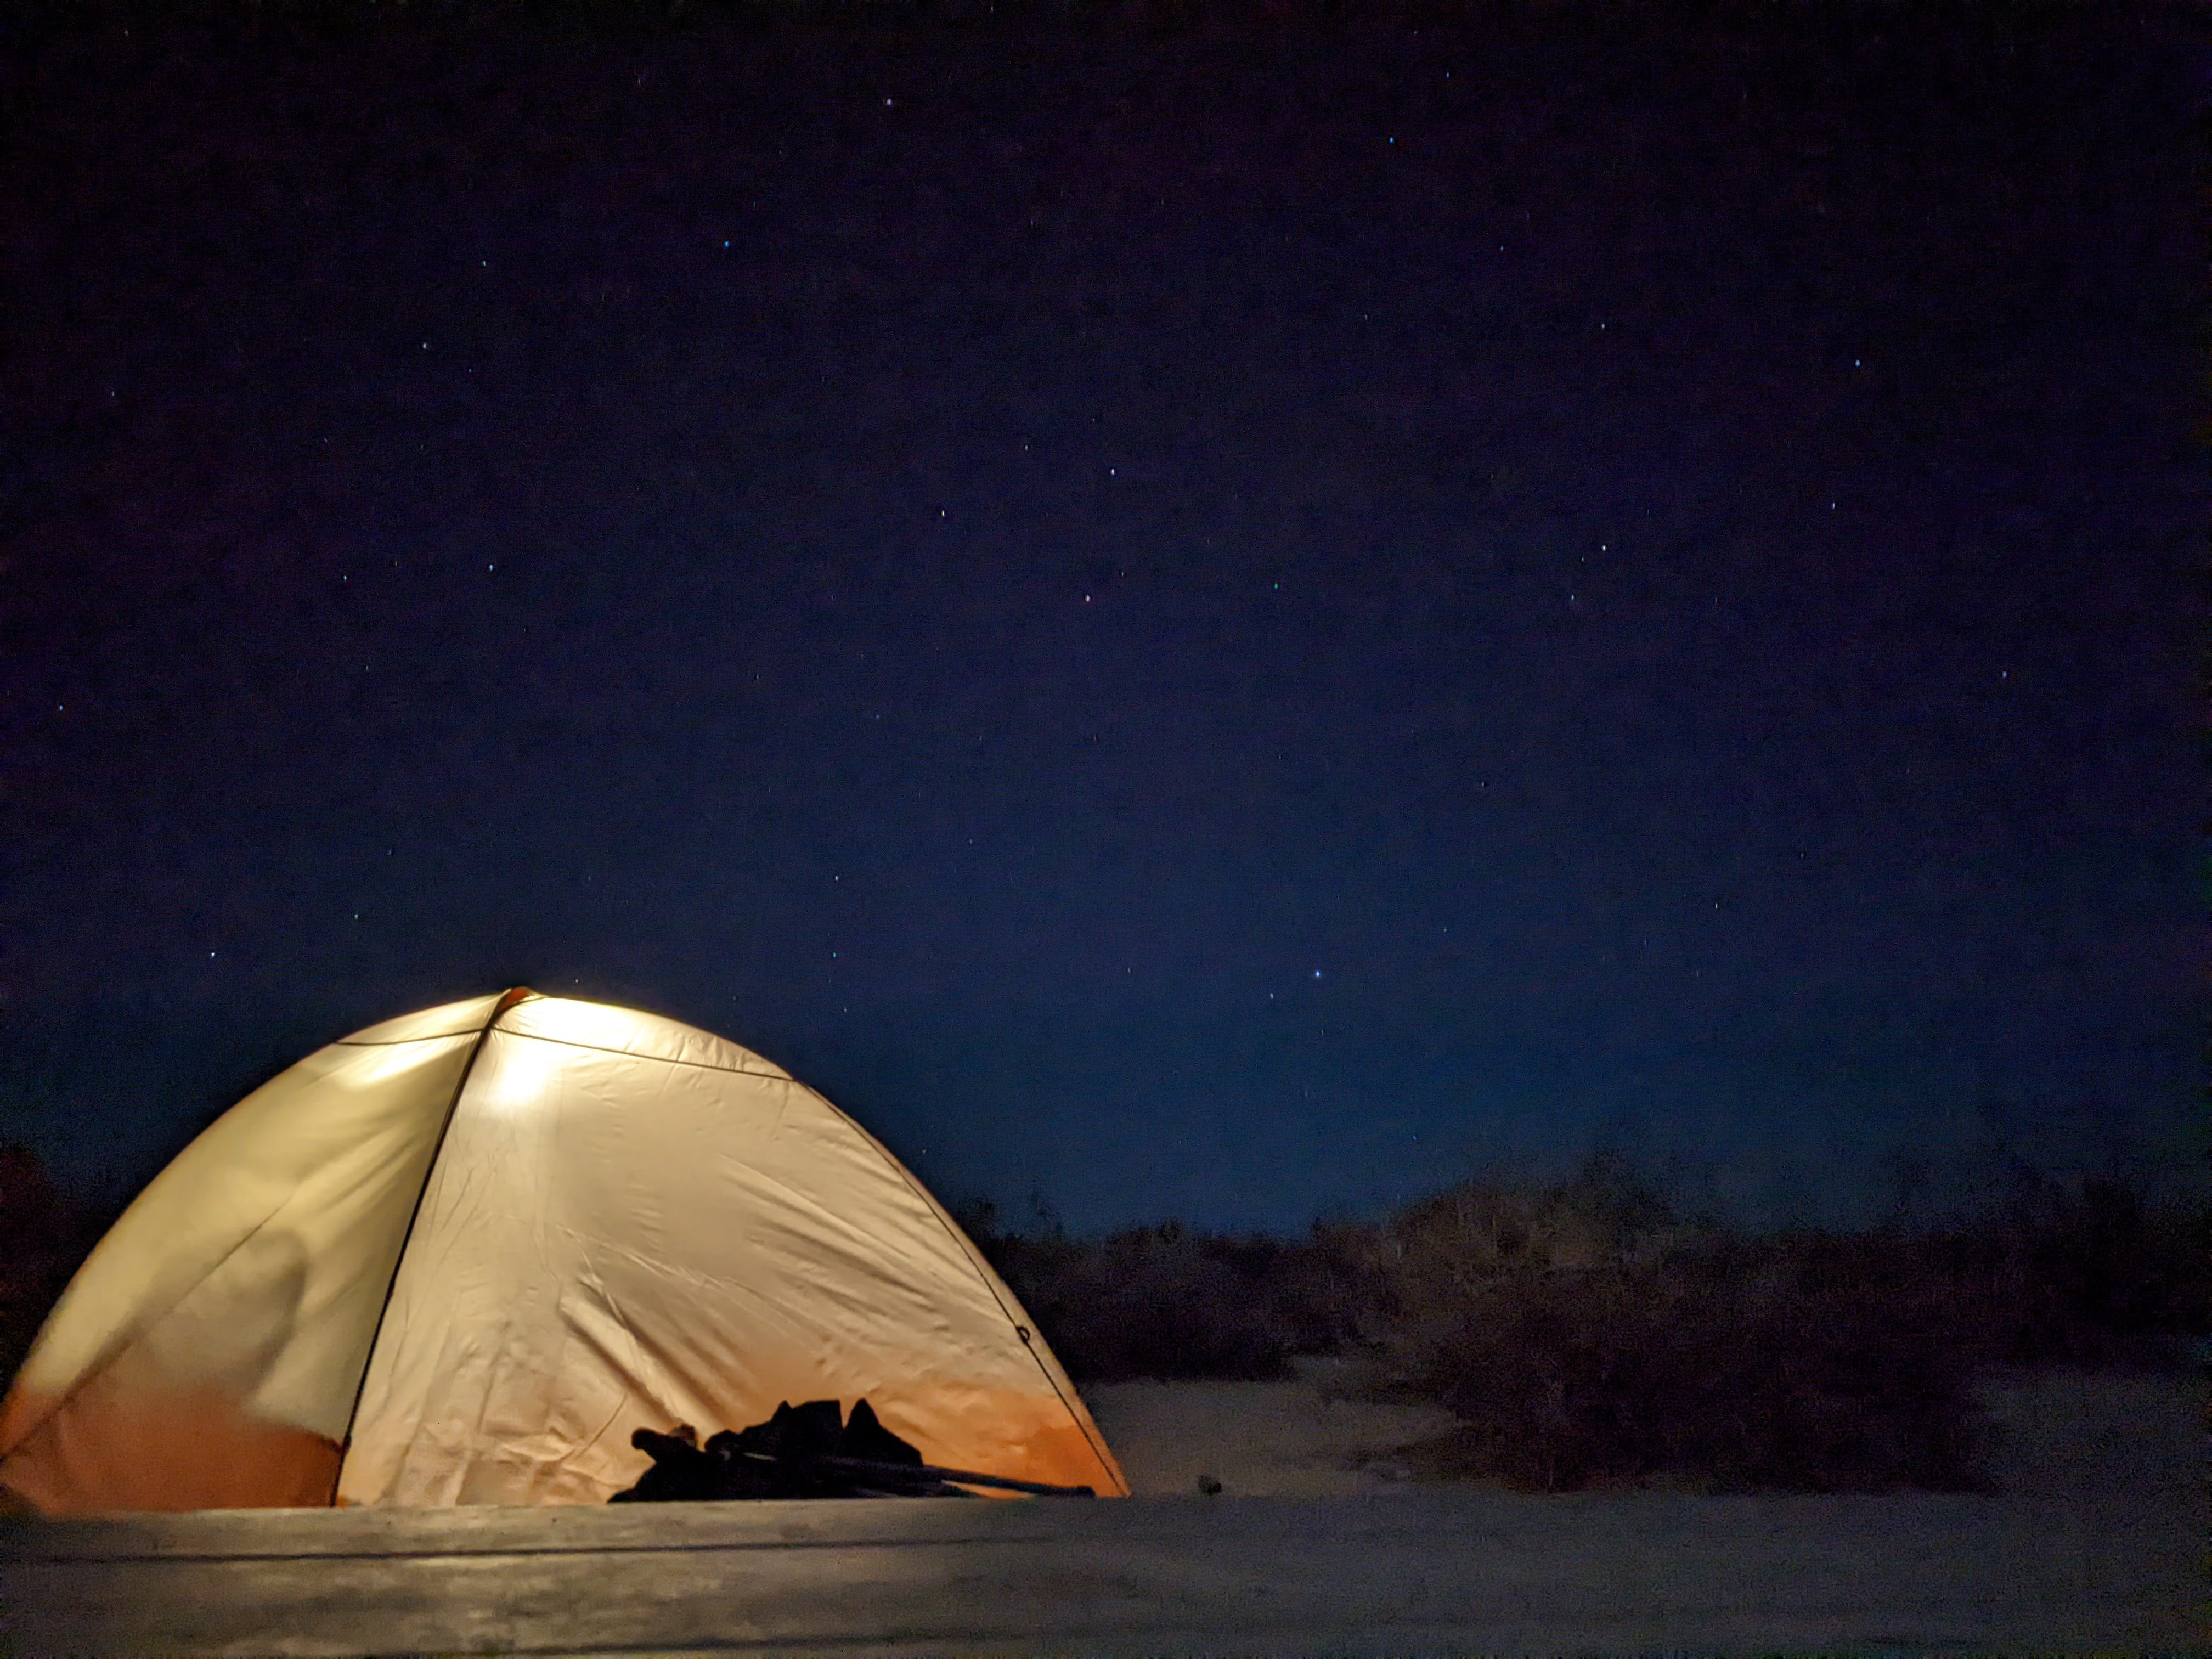
Home from our trip, I finally got a chance to go through the shots I took last Tuesday morning (November 8, 2022) of the total lunar eclipse from my brother- and sister-in- law's house in Islamorada, Florida on Lower Matecumbe Key. This view is looking to the west over Florida Bay.

I shot from about 4:30am EST until about 6:15am EST when morning twilight washed out the eclipsed Moon. I would have started earlier as the eclipse started at 3:03am EST but the view was obscured by the clouds when I went out to shoot, finally clearing about 4:20am EST.

I've shot lunar eclipses where the Moon appeared larger than this but for this project I needed a wide angle view, allowing me to capture individual lunar disks reflecting the changes in the Moon's appearance through each phase of the eclipse. My goal is to create a composite shot with multiple lunar images spaced across a shot like this. The individual lunar disks will run in an arc from near the top of the image, right down between these two palm trees, each lower than the previous as the Moon got closer and closer to the horizon. I used the Stellarium sky app and the PhotoPills planning app with its augmented reality view to plan where to set up for this shot and confirm it would look like I had in mind. 

Creating the composite image is going to take a little work (combining data from about 15 shots taken once every 7 minutes) so stay tuned and I'll post when it is finished.

In the meantime, I was pleased with this image taken near the beginning of morning twilight so thought I'd go ahead and share it now. It's also highlighted on EarthSky.org here.

Enjoy!

Click on image to view full screen.


Equipment Details:

Nikon D750, Nikkor 24-120mm lens at 24mm, Peak travel tripod, camera control with qDSLRDashboard app on Pixel 5, planning with PhotoPills and Stellarium apps on Pixel Slate

Post-processing Details:

Lightroom: minor exposure adjustment, applied lens profile and chromatic aberration adjustment, transform to correct distorted perspective, crop

Photoshop: burning to reduce brightness of dock lights, dodging to slightly increase brightness of moon against twilight sky, use sky mask and a noise filter to reduce color banding when saving to PNG file format

Friday, August 5, 2022

Eaton Family Solarcan Project - Phase 3: Jack and Harper

As covered in previous posts, late last year I discovered a product called the Solarcan, a pinhole camera created using an aluminum can with a small hole in the side and photographic paper inside, all to capture long-period exposures (weeks, months, years) of the Sun as it moves across the sky each day, images called solargraphs. I bought a five-pack of Solarcans in December and gave four to my grandkids as Christmas gifts . 

In the Phase 2 posts, I covered helping my grandkids set up their Solarcans. The plan for each one was to have them up about 6 months. For the ones Jack, Harper and I put up (see this post), the 6 months was up on July 17th. Here are views of the their Solarcans as we prepared to take them down on July 29th:

Jack's Solarcan
Harper's Solarcan

One of the things we noticed is that each of their Solarcan's were just a little bit crooked; they were straight when we put them out. More about this below. 

Following the Solarcan instructions for developing solargraphs, we scanned each image. 
Scan of Jack's solargraph
Scan of Harper's solargraph

The initial scans look a little odd... the sky and the arcs traced by the Sun are dark and the foreground is light. The reason is that the photographic paper reacts to light by darkening, resulting in a negative image. The bright spot on the sides of each image are the result of tabs on the inside of the Solarcan that hold the paper in place; because they overlap the paper, they block the light, preventing the paper from darkening. 

The next step in the development process is to convert each image from negative to positive. After that, the goal processing is getting an image in which some of the details come out (e.g., adjusting exposure and contrast) and adjusting color and other variables to get something that looks interesting. Here is the final result. 
Jack's finished solargraph
Harper's finished solargraph

As covered in the Phase 2 post, Jack's Solarcan was mounted in their back yard with the shop and chicken coop in the foreground while Harper's was mounted in their front yard with a view of the house in the foreground (though the chicken coop was visible over the fence). If you look closely, you can see all those details in these images. 

As with other solargraphs (including Olivia's), the lines traced across the top of the image represent the path of the Sun each day. These solargraphs were started about a month after the winter solstice so the earliest lines are the lower ones, reflecting the low path across the sky of a winter Sun. As time passed, new lines appear higher and higher on the image. Gaps appear where there were days (or parts of days) in which the Sun was obscured by clouds. One reason there are differences in these two solargraphs (even though they were mounted relatively close together) has to do with another thing that blocked the sunlight: tree limbs. You can see the trees more prominently in Harper's solargraph. You can see in the first images above that there are trees closer to where it was mounted compared to Jack's.  

The other unusual aspect of these images is the strange "double-exposure" appearance, most obvious on the right side of Jack's image where there is a second, lighter horizon above the darker horizon below and the lighter one is at an angle. As mentioned above, we installed each Solarcan vertically on a post but when we took them down, each was just a little crooked. 

We aren't sure what happened but it seems clear that about 4 months (roughly 2/3rd of the way through the exposure) something knocked each can over a little. When that happened, effectively a "new exposure" was started. It's hard to tell but the effect even shows up in the lines traced by the Sun (the highest ones are a bit blurred where ones traced after the cans were knocked over overlap the earlier lines). 

Although our initial reaction was that this was an error, that the solargraphs were "messed up", the more we talked about it, the more unique it seemed. Jack, Harper and I now consider these to be extra special, very unique!

As always, click on an image to see full screen.  

HST Transit Attempt: Failure is How We Learn

I camped out in Chris and Katie's backyard last night with my Nikon D750 and telescope (Sky Watcher Evostar 72ED) to try and capture a transit of the Hubble Space Telescope (HST) across the face of the Moon. Unfortunately, I didn't capture it. I'm not too surprised... stories from people who have captured a lunar transit of the International Space Station (ISS) often describe making 4-5 attempts before success and the ISS is about 10 times as large as HST in the sky (between HST being both physically smaller and about half again further away). 

This was my second attempt at a lunar satellite transit. I'd done a test shot of a transit of the Chinese Space Station (Tiangong) a few weeks ago. For that one, I had tried shooting a rapid series of shots but with the transit only lasting about a few seconds, I just was not shooting fast enough to capture it. That led to my plan for last night to try shooting 60 frame per second video with the goal of using individual frames to create a composite image. Assuming I had captured anything. Which I didn't. :-(

The evening wasn't a total bust though. On the one hand, I got useful information about trying to shoot video to capture something like a lunar transit. The high ISO I used resulted in far too much noise, so much so that I suspect the HST is there in my video but lost in the noise. I need to do some night time Moon video test shots to see how low I can set the ISO and still get decent video. I also learned that trying this when the moon is so close to the horizon (it was at only about 11 degrees, just above the trees along the back of their property) just makes it tougher since with it that low means shooting through more atmosphere and there is also more air turbulence. 

The end result of the evening (besides the things I learned) is this hazy shot of a first quarter moon, created with some editing in Photoshop to merge two images; one with the Moon properly exposed and the other with the high, thin clouds showing (but in which the Moon was completely washed out). 

Learning something new every day! 


Saturday, July 30, 2022

Eaton Family Solarcan Project - Phase 3: Olivia

As covered in previous posts, late last year I discovered a product called the Solarcan, a pinhole camera created using an aluminum can with a small hole in the side and photographic paper inside, all to capture long-period exposures (weeks, months, years) of the Sun as it moves across the sky each day, images called solargraphs. 

I bought a five-pack of Solarcans in December and used one to shoot a sample shot to share with my grandkids; see Phase 1 post. I gave the other four to them as Christmas gifts. 

In the Phase 2 posts, I covered helping my grandkids set up their Solarcans. The plan for each one was to have them up about 6 months. For the one Olivia and I put up (see this post), it turned out we needed to take it down a little early. On July 9th, we took it down. Here is the raw scan. 

Although the arcs traced across the sky by the sun are pretty easy to make out at the top, they do look a bit weird. One reason is that this photo, captured with a camera created with a piece of photographic paper inside a can with a pinhole on the opposite side of the can, is a negative, i.e., things that are bright appear dark and vice versa. 

So, the first step in processing a Solarcan solargraph after scanning it is to convert it from a negative to a positive. From there, everything else is about getting an image in which some of the details come out (e.g., adjusting exposure and contrast) and adjusting color and other variables to get something that looks interesting. The full workflow for this is described in the Solarcan instruction booklet

With Olivia's, I played around with two different color schemes, one blue and one magenta. Olivia likes the magenta one best. Here they are. 

To get a better sense of what the foreground in these show, check out the photo of their backyard from the Phase 2 post

On the left is their fence with the neighbor's trees just beyond. On the right is their house including the chimney at the far end of the roof. In the center is their patio with furniture, a grill, etc. 

As for streaks across the top, those represent the path of the sun arcing across the sky from East to West every day during the 140 days the Solarcan was up. 

As described in the earlier post, the gaps are the result of weather, specifically clouds. Bright, sunny days left a full arc from one side the to other. Overcast days left dark arcs where bright enough sunlight didn't hit the photographic paper to leave an imprint. Partly cloudy days resulted in arcs across the solargraph with gaps here and there. 

By the way, the reason the arcs of the Sun disappear off the top of the page is just because we mounted the Solarcan vertically and as the Sun got higher in the sky during mid-day, the light from it didn't fall directly on the photographic paper. If we had mounted it angled up slightly, then we would have gotten the full path of the Sun each day. 

Next up, I'll post about developing the solargraphs for Jack and Harper's Solarcans which we took down this week. Kaili's will stay up until about Christmas. Stay tuned for more images!

As always, click on an image to view full-screen. 

Friday, July 15, 2022

July Waning Gibbous Moon

As a follow-up to the supermoon shot in my previous post, last night I spent time fine-tuning my technique for shooting the moon with the equipment I described in that post. Here is the result. 

The main difference is that for this shot I added a 2X teleconverter to increase the focal length. A longer focal length results in higher resolution for the subject, in this case, the Moon passing from full phase to gibbous phase. 

The Evostar 72ED has a focal length of 420mm. It's necessary to use the 85% focal reducer/corrector to capture images through it with a camera so that reduces the effective focal length to 357mm; that was what I used for the image in the prior post. Adding the 2X teleconverter increases the effective focal length to 714mm. The resulting higher resolution provides greater detail in this image. 

This photo is the result of stacking the 3 best of 12 shots using PlanetarySystemStacker. I then followed this tutorial to post-process the image in Lightroom Classic. While some of the improvement over the last image is due to the post-processing, I think that overall this is a much better shot thanks to using the teleconverter and spending more time getting as sharp focus as possible. 

Enjoy!

Thursday, July 14, 2022

July 2022 Supermoon

As reported on EarthSky and other sites, the full moon yesterday was the closest and brightest of 2022, fitting the definition of what is now commonly referred to as a supermoon. It was cloudy to the east when I went out to the north shore of White Rock Lake to capture it rising over Corinthian Sailing Club so initially it wasn't visible but it eventually started peaking out of the clouds, appearing very orange. Here is the shot I captured with a Nikon D750 attached to our Evostar 72ED telescope and 85% focal reducer/corrector mounted on our Sky Watcher Star Adventurer tracker. This is the result of processing 150 shots, first cropped and exposure adjusted with Lightroom Classic and then stacked with PlanetarySystemStacker to get a cleaner, sharper image.

This is a pretty crude result as I am still learning how to get optimal focus with the camera on this telescope, how to balance the tracker to improve stability and how to use the stacking software. More to come...

While I was shooting this, I had another camera taking shots for a timelapse video of the supermoon rising over the sailing club and the lake. I'll post that after I have time to work on editing and rendering it. 

Click on the image to view full screen. Enjoy!


Saturday, July 9, 2022

First (and Second) Light with New Equipment

Earlier this year, we started on the journey to replace our older telescopes, a Parks 60mm refractor (currently for sale) and an Orion 8" Dobsonian reflector, with something lighter and smaller. The new telescope is a Sky Watcher Evostar 72mm ED apochromatic refractor. It is under 18" long and only weighs a touch over 4 lb so it's very portable. On a solid mount and using our Sky Watcher Star Adventurer tracker, it makes a very nice platform for both visual and photographic views of the sky. 

The telescope itself is optimized for viewing large but dim structures like galaxies and nebulae but with the right optics it works well for wide-field views of the planets, the Moon and the Sun. Of course, for solar viewing, it takes more special equipment. As with our other telescopes, I opted for one of the more affordable solutions, a filter made of Baader solar film. I had ordered Baader film from the Baader Planetarium but I needed a holder to fit the new Evostar. Instead of creating one from scratch out of cardboard as I did for the 2017 Total Solar Eclipse, I searched online and found a design on Thingiverse. Thanks to Dari Esfahani for creating it for me on his 3D printer. 

Here are shots of the finished filter and the new telescope.


On Friday, I set up the telescope and filter in the backyard. The view was great as there is plenty of sun spot activity right now (see SpaceWeather.com). I grabbed a shot through the eyepiece with my phone as it was too hot (105°) to take the time to mount my camera on the telescope. This morning before it got so hot, I tried again with the camera mounted on the Evostar. So, here are the "first light" and "second light" shots for the new solar filter. 

Taken with Pixel 5 cell phone through 
eyepiece on Evostar 72ED

Taken with Nikon D750 mounted on
Evostar 72ED

The shot taken with my phone isn't quite as clear and it has some odd artifacts from how the phone camera processed the image but otherwise, it isn't too bad. The shot through my Nikon D750 is sharper though I was a bit rushed and I think I can get even sharper focus the next time. As for the differences in the sun spots between the two images, it is in part because the orientation of the phone camera yesterday vs. the Nikon this morning plus a small difference in the size and location of each sunspot due to the time that had elapsed between each shot. 

With the new solar filter, I'll be spending more time watching and photographing the surface of the sun. Stay tuned!

As always, click on an image to see full-screen. 

Tuesday, June 28, 2022

Moon and Five Planets over Downtown Dallas Skyline - This Time With the Pleiades


In my last post, I described my efforts to capture an interesting image with the Moon and all five naked-eye planets lined up in the order of their orbits out from the Sun. As the conditions on June 24th were not ideal and elusive Mercury was mostly lost in the haze over Downtown Dallas, I tried again on Sunday, June 26th. The sky was much clearer (at least over the Dallas skyline) and there was less haze. Thankfully, staying up almost all night a second time was definitely worth it!

In the image above, I've added an enlarged insert of each object and labeled them to give everyone a more clear idea of what they are looking at without having to click on the image to see it full screen and then zoom in to tell what each object is. The original, unlabeled image is also included below. 

While the surprise on Friday's outing was the ISS flyby (I'm still working on the timelapse videos from both Friday and Sunday), the surprise in these images is that I also captured the Pleiades star cluster (M45), which you may know as the Seven Sisters (immortalized in the Subaru logo)! 

Another difference between this image and the one from the 24th is that the Moon is "older", now 28 days through its cycle (vs. 26 days on the 24th). Just two days from being a New Moon, in this image it is a thin crescent, only 4% illuminated. However, thanks to the length of the exposure (2 seconds), the camera captured not just the sun-lit crescent but it also captured earthshine, the portion of the Moon not in sunlight but still lit but the sunlight reflected off of the Earth. 

For anyone interested in how this image was created, I started out by taking multiple shots with a Nikon D750 and the kit lens, a Nikkor 24-105mm f/4 lens set to it's widest at 24mm. Each of the 6 images used were taken in portrait orientation and, using a tripod, I started shooting to the left of Mercury, then moved the camera about 35 degrees to the right so that the next shot would be overlapped with the previous, continuing until I had the final shot including Saturn. Each image was taken at ISO 200, f/4 and as noted above, exposed for 2 seconds.  The screenshot to the right was my shooting plan from PhotoPills with the red dot representing my location on the west levee of the Trinity river and the black dot representing the Bank of America Plaza tower (the tallest building in Dallas, the one in the panorama with the bright green lights), about 1.6 miles away. The Margaret Hunt Hill Bridge, the white suspension bridge arch in the center of the panorama, crosses the Trinity.  The lighter dashed lines with black dots represent the left, center and right of the field of view in the panorama. 

Post-processing involved using software (Adobe Bridge and Adobe Camera Raw) to merge the 6 shots into one panorama, then crop and apply adjustments for exposure, sharpness, etc. Next, I edited that image in Photoshop to add the insets and labels. As the merged image exhibited some color banding in the morning twilight sky, I used a technique involving adding a little noise to the image to reduce the banding. Note that I also took some creative license with this shot, editing the inset of the Pleiades to emphasize the major stars so it would be more recognizable.

As always, click an image to view full-screen. Enjoy!


Friday, June 24, 2022

Moon and Five Planets over Downtown Dallas Skyline


Step outside this morning about 45 minutes before sunrise and you would have seen an incredible sight, a unique alignment of the visible planets along with a waning crescent Moon.  It's not all that rare to see some combination of planets before sunrise or after sunset but it's pretty rare for them to be aligned in the order that they occur extending out from the Sun: Mercury, Venus, Mars, Jupiter and Saturn. Even more so with the Moon in view.

There's nothing special or mysterious about this alignment. It just happens that the relationship between Earth and each of the other planets in their orbits around the Sun is such that they line up this way now. But isn't it beautiful! 

I had originally planned to go find a spot out in the countryside with dark skies to take this shot but just the Moon and planets on their own with nothing interesting in the foreground seemed a bit boring. I did a number of test shots over the past week and determined that even with the bright lights of downtown Dallas, they would still be visible in a shot like this. 

Unfortunately, the haze was just a bit too heavy this morning for Mercury to really show up. It's there but just hard to see without zooming in really close. Given how close the planet orbits the Sun, it is never that far above the horizon while the sky is still dark enough to see it. I have some other shots I still need to go through though so if I have another where it's more visible, I will post it. 

This image was created by taking four shots with a 15mm wide angle lens. Two were taken with the camera level (to avoid vertical distortion of buildings, bridges, etc.), one aimed just left of the Margaret Hunt Hill bridge (the brightly lit suspension bridge) and the other aimed towards the bright street light to the right. The other images were taken in the same directions but aimed high enough to capture Jupiter and Saturn. The four images were merged as a panorama in Adobe Lightroom. 

The panorama above is only part of what I was working on this morning. I also captured nearly 3000 shots over almost 3 hours that I plan to assemble into a timelapse video. The image to the left shows the shooting setup. The camera on the left is my Nikon D750 with a 14mm Rokinon lens; it's taking the timelapse sequence of images. The camera on the right is my son Brian's D750 with our Irix 15mm lens; it's what I used to take the shots for the panorama. 

Stay tuned for the timelapse! Besides the Moon and planets, it features a special guest appearance from the ISS. 

Click on images to view it full-screen. 

Tuesday, June 14, 2022

A Strawberry Moon Over Downtown Dallas


If you happened to be up early the morning of June 14th, 2022, prior to sunrise, you might have caught a glimpse of the full Moon. I say might, because if you  look closely you'll notice a wisp of clouds across the face of the Moon and within a few minutes of when this was taken, the clouds completely obscured any lunar view. 

This shot with the full Moon over Downtown Dallas was taken from Winfrey Point on the east shore of White Rock Lake. I had hoped to capture it lower, just above the city skyline shortly before it set but this was the last shot I got before the clouds moved in. If only the clear view had held for another 15 minutes!

You can still catch a view of this month's full Moon (weather permitting). Just step outside the evening of the 14th after about 9:22pm CDT and watch for it to rise in the east. Even early morning and late evening on the 15th it will still be almost full (about 98% illuminated). 

If you have watched news headlines in print, broadcast or online, you probably saw this Moon referred to as a Strawberry Supermoon. In simple terms, the name Strawberry is a historical name (among others) given to full Moons in the month of June and a Supermoon is just a full Moon when it is closer in its elliptical orbit around Earth than at other times. For more information on this month's Moon, check out this article about it on EarthSky.org

Click on the image to see full-screen. 

Tuesday, May 31, 2022

Eaton Family Solarcan Project - Phase 2: Kaili

As covered in previous posts, late last year I discovered a product called the Solarcan, a pinhole camera created using an aluminum can with a small hole in the side and photographic paper inside, all to capture long-period exposures (weeks, months, years) of the Sun as it moves across the sky each day, images called solargraphs. See Eaton Family Solarcan Project - Phase 2: Olivia for more on solargraphs and the beginning of our adventure with Solarcans. 

Recently, we spent the day with our oldest granddaughter, Kaili.  While at their house to pick her up, she and I installed her Solarcan.

As with Olivia's family, Kaili and her parents lives in the burbs. Kai is an athlete, having played many sports including soccer, football, golf and basketball. Their house is on a cul-de-sac with two basketball backboards across from each other. We decided that placing her Solarcan on the fence along the north side of the cul-de-sac, facing due south with one of the backboards in the foreground and one just off in the distance, would make for an interesting solargraph, one that highlighted her love of sports. 

Below is an aerial view with current directions for sun rise (yellow line) and sun set (orange line) as of the summer solstice, June 21st. The thinner line represents the direction of the sun a little after solar noon that day (keeping in mind that due to daylight savings time, solar mid-day is actually 1:00pm CDT). 

Installed this way, over the coming months the sun should trace arcs from left to right, from one side of the cul-de-sac to the other with their house on the west side. Each day the sun will trace an arc a little higher until we get to the summer solstice after which the arcs traced will be lower and lower. 

An interesting facet of the installation of Kai's Solarcan is the basketball backboard in the foreground; see the view from the installed Solarcan below. The sun's path across the sky as we get late in the year may go just behind the backboard, outlining it in silhouette. 

Of course, the backboard won't be the only thing that blocks the sun's tracks on the solargraph. Some days will be overcast, with clouds completely blocking the sun, while other days will be partly cloudy with the sun's path on the solargraph appearing with gaps during periods when the clouds are covering it. 

To see the final result, now we just have to be patient!

Our plan is to leave it up until just after the winter solstice, probably taking it down and developing the image around Christmas. Once that's done, I'll post the final solargraph and what we learn from it. 

Stay tuned!

Click on images to enlarge.


Monday, May 30, 2022

A Night to Remember

When traveling to visit our friends who live in Palm Desert, CA, I packed the gear I could carry on a flight, opting for my travel tripod instead of a heavier Radian tripod and leaving the Star Adventurer tracker at home. My friend David had reserved a camp site for us for Mother's Day evening and his son-in-law Erik joined us. After setting up camp and enjoying the view as twilight ended, we hit the sack and set alarms.

My original plan was to do a multi-shot panorama of the full Milky Way arch. Unfortunately, when planning the shoot in PhotoPills (photo planning software), I had inadvertently scrolled forward a day so when my alarm went off instead of having a half-hour of moonlight to shoot the foreground and time enough to shoot the full arch while it was relatively low in the sky, I woke up up to a moonless sky and the arch already getting a bit too high for the shot I planned. Once I realized my mistake, I focused on just enjoying the view and getting a few decent shots including this one, taken with a Nikon D750 and an Irix Firefly 15mm f/2.4 wide angle lens.

My decision to go with B&W was in part because the sky colors were off and rather than do heavy edits to get a more natural look, I chose to take color out of the equation. My assumption about the colors I found when editing the raw image is that it perhaps had to do with the massive amount of dust in the air. That entire weekend, winds from San Bernadino south to the Salton Sea where blowing so hard that when we left Palm Desert Sunday afternoon headed to the campground, we couldn't see a mile down the road and could hardly see the mountains of Joshua Tree. At the campground at 3000 feet, the air was much clearer but the sunset that evening was orangish as was the light dome from Blythe that shows up in this image (which I also think was more prominent due to the amount of dust in the atmosphere).

The labels in this image were carried forward from a test shot done a few nights before taken at our friend's place above Palm Desert, an attempt to do some test shooting for the panorama that was thwarted by high, thin clouds. I had shared the one shot from that night where Scorpius was visible with friends, including similar labeling, so this version of this shot was labeled to relate the two images. See below for the unlabeled version plus a few other shots from the trip.

Click on any image to see enlarged.

The Milky Way over Joshua Tree National Park
(Light dome is Blythe, CA)

Low visibility leaving Palm Desert, CA

Sunset at Joshua Tree National Park

Cottonwood Campground Amphitheater

Campsite


Friday, May 13, 2022

Mountain Cloud Timelapse


A brief timelapse capturing a cloud formation building and blowing away over the Santa Rosa mountains south of Palm Desert just after sunset. Taken from base of the Cahuilla Hills off of CA-74. 

Down in the Coachella Valley, the winds were blowing heavy and dust bad enough to make seeing Joshua Tree to the north difficult.

More to come from our visit to Palm Desert...

Saturday, May 7, 2022

Four Morning Planets, Part Duex

As mentioned in my last post, I am looking for additional opportunities to capture the parade of naked-eye planets across the morning skies this spring. Unfortunately, over the past two weeks, most mornings were overcast, whether in Dallas or Los Angeles, preventing me from seeing and shooting this unique event again. Sadly, that included even being able to see the close conjunction of Jupiter and Venus as they traded places in the parade. 

Thankfully, in Palm Desert things have been much clearer so a few days ago I was able to capture them again, this time with palm trees and Southern California mountains instead of oak trees and Lake Buchanan. I was also able to plan the shot, shooting earlier in the morning before the twilight glare made it so difficult to see them as in the prior post. 


Saturday, April 16, 2022

Four Morning Planets

After wrapping up my time shooting the Milky Way outside our room at the Canyon of the Eagles resort on Lake Buchanan (see my last post), I noticed a bright light through the trees and stepped across to the eastern view of the lake to check it out. Realizing it was Venus, I recalled the unique alignment happening this spring, a clear view of four of the five planets able to be seen with the naked eye in the morning skies: Jupiter, Venus, Mars and Saturn. I set up my equipment again and took a number of shots; below is the best of them with the planets aligned as in the Stellarium screen shot above. 

As this will progress into early summer with the planets jockeying for position relative to each other, the stars and occasionally the moon, I'll be looking for additional opportunities to capture this rare alignment including in late June when Mercury joins the other four. 

Click on image to view full screen.


Thursday, April 14, 2022

The Milky Way Outside Our Door

One thing that has been on my bucket list for a long time has been staying at a resort that focuses on astronomy and dark sky observing. The closest to us is Canyon of the Eagles resort near Lake Buchanan in the Texas hill country north west of Austin. Now that I have retired, Linda and I decided to take a few days to check it out. I'll share more about the trip later but for now I'll just share this image of the Milky Way taken just in front of our room. 

I literally took this photo in my PJs!

About 4:30 am, I pulled on a coat and stepped out the door of our room with my equipment to try catching the Milky Way at its highest elevation but also at a time when the moon was close to setting since the nearly full moon is so bright it makes it difficult to see dim things like the Milky Way. I started shooting with my rig out on the open area overlooking the lake about 10 yards from the room. I haven't taken a close look at those shots yet but hopefully a few will turn out okay in spite of the moonshine.  

Just as I was about to quit and go back to bed, I decided to try one more set of shots from the steps to our room. This was taken at 6:07 am, just minutes after the moon set so the sky wasn't quite as washed out as earlier shots were. And although it was about 24 minutes past the start of astronomical morning twilight (typically too late for a good capture of the Milky Way) I think it came out pretty good considering the conditions. 

Click on the image to see full-screen. If you look closely, you will see a few white streaks. Those are satellites. The exposure time for this image was 8 seconds so those streaks represent the path of each of those satellites over that period of time. 

Note that editing Milky Way images is a bit of an art and something I don't have a lot of experience with yet so you may see this or other images from this trip posted later on with improved edits.

Monday, March 28, 2022

The Moon Meets Venus, Mars and Saturn in Morning Sky

Living in a neighborhood full of old, tall trees, it takes getting out of the neighborhood to have a clear horizon. White Rock Lake is a favorite destination so I picked a spot on the west shore from which to shoot this beautiful conjunction between the crescent moon, brilliant Venus above with Saturn and Mars between the two. I think the reflection of the moon and reeds in the foreground made for a more interesting image.

Read more about the conjunction and see photos of it from around the world at EarthSky.org

Click to see full-sized


Sunday, February 27, 2022

Eaton Family Solarcan Project - Phase 2: Olivia

As covered in previous posts, late last year I discovered a product called the Solarcan, a pinhole camera created using an aluminum can with a small hole in the side and photographic paper inside, all to capture long-period exposures (weeks, months, years) of the Sun as it moves across the sky each day, images called solargraphs. 

Here is an example from the Solarcan Gallery:

I bought a five-pack of Solarcans in December and used one to shoot a sample shot to share with my grandkids; see Phase 1 post. I gave the other four to them as Christmas gifts. 

Last week, we visited our son Brian, his wife Amber and grandkids Olivia and Owen.  At 16 months old, Owen isn't quite ready for solargraphy so didn't get a Solarcan this time but Olivia and I spent time during our visit planning and installing hers.

While Jack and Harper (last post) live in a rural setting, Olivia's family lives in the burbs.  They have a new patio and it is where she, Owen and their Dachshunds, Oliver and Dash, love to play. It happens that their house faces almost due north so we installed Olivia's Solarcan on the front fence facing due south with their patio centered in the view. Here is an arial view with current directions for sun rise (yellow line) and sun set (orange line). 

Installed this way, over the coming months the sun should trace arcs from left to right, from above their  fence across the sky to their roof with the side yard and patio centered in the view. Each day the sun will trace an arc a little higher until we get to the summer solstice after which the arcs traced will be lower and lower. Here is the view from Olivia's installed Solarcan. 

Similar to the case with Harper's and the gallery example above, with some trees in view on the left, there should be some gaps in the solar paths across the image where branches block the light,  adding an interesting twist to the solargraph  when it is done. 

But the trees won't be the only reason for gaps. Notice the other gaps in the tracks of the sun in the gallery example? Any idea what those are from? 

You guessed it: cloudy days. Naturally, we can't capture the light of the sun on days when it's not visible!

When will we find out what Olivia's finished solargraph looks like? Our plan is to leave it up about 6 months but since we didn't get hers up until almost two months after the winter solstice, the lower tracks left by the sun won't be as low as they could have been. If she is patient, perhaps hers can stay up for a full year in which case there will be arcs of the sun across her solargraph from as low as the sun gets in the winter to as high as it gets in the summer! 


I'll post the results later this year so stay tuned... 


Tuesday, February 1, 2022

Eaton Family Solarcan Project - Phase 2: Jack and Harper

As covered in the Phase 1 post, I've started playing around with a product called the Solarcan, a pinhole camera created using an aluminum can with a small hole in the side and photographic paper inside, all to capture long-period exposures (weeks, months, years) of the Sun as it moves across the sky each day, images called solargraphs. 

I bought a five-pack in December and used one to shoot a sample shot to share with my grandkids; see previous post. I gave the other four to them as Christmas gifts. 

Earlier this month, we went to see son Chris, his wife Katie and our grandkids Jack and Harper. They have about an acre out in the country. They also have chickens and an Australian shepherd. Not quite a farm but still a very rural setting. I figured this could make for some interesting solargraph images. 

First, Jack and I talked about where a good spot would be for his Solarcan. They have a power pole on the northern edge of their property so we selected as the place to install his camera. 

From this spot, there is a full view of their backyard. The resulting solargraph should have bright lines arcing across from left to right over the shop and chicken coop. Movement of earthbound things generally won't be captured in the image so the solargraph will probably not include people, the dog or chickens.  

Pin marks the spot for Jack's Solarcan. It's oriented towards noon-time solar position. 

The view from Jack's camera. The chicken coop is next to the shop in center of image. 

When it came time to set up Harper's Solarcan, she wanted to have a view of their front yard so we picked a fence post out front. As we were setting it up, she realized she really wanted to have the chicken coop in the view. By mounting the camera a bit higher on the post, the coop is just visible over the fence so she was happy with that. 

Pin marks the spot for Harper's Solarcan, also oriented towards the noon-time solar position.

The view from Harper's camera. Note the tree branches. The chicken coop is just over the fence.

For Harper's Solarcan, one thing that will be interesting is that as the sun traces tracks across the image from lower left, up across the center and then down to the lower right, it will pass behind branches of the trees along the fence line on either side. 

In most solargraphs, the lines traced by the sun have occassional gaps caused by periods of cloudiness. For Harper's, there will also be gaps from the branches obsuring the sun. With the wind blowing them and the trees growing, the gaps may change from day to day, week to week. 

The differences between Jack's and Harper's solargraph images, both in terms of the overall scenes and with the view being mostly clear in Jack's but with Harper's having branches in the view, should make seeing each of these side by side when done very interesting. 

Now that they are up, the plan is to leave them up about 6 months. We didn't get them up until a month after the winter solstice so the lower tracks left by the sun won't be as low as they could have been but each day between now and mid-summer the tracks will go higher up the image. 

I'll post the results later this year so stay tuned...