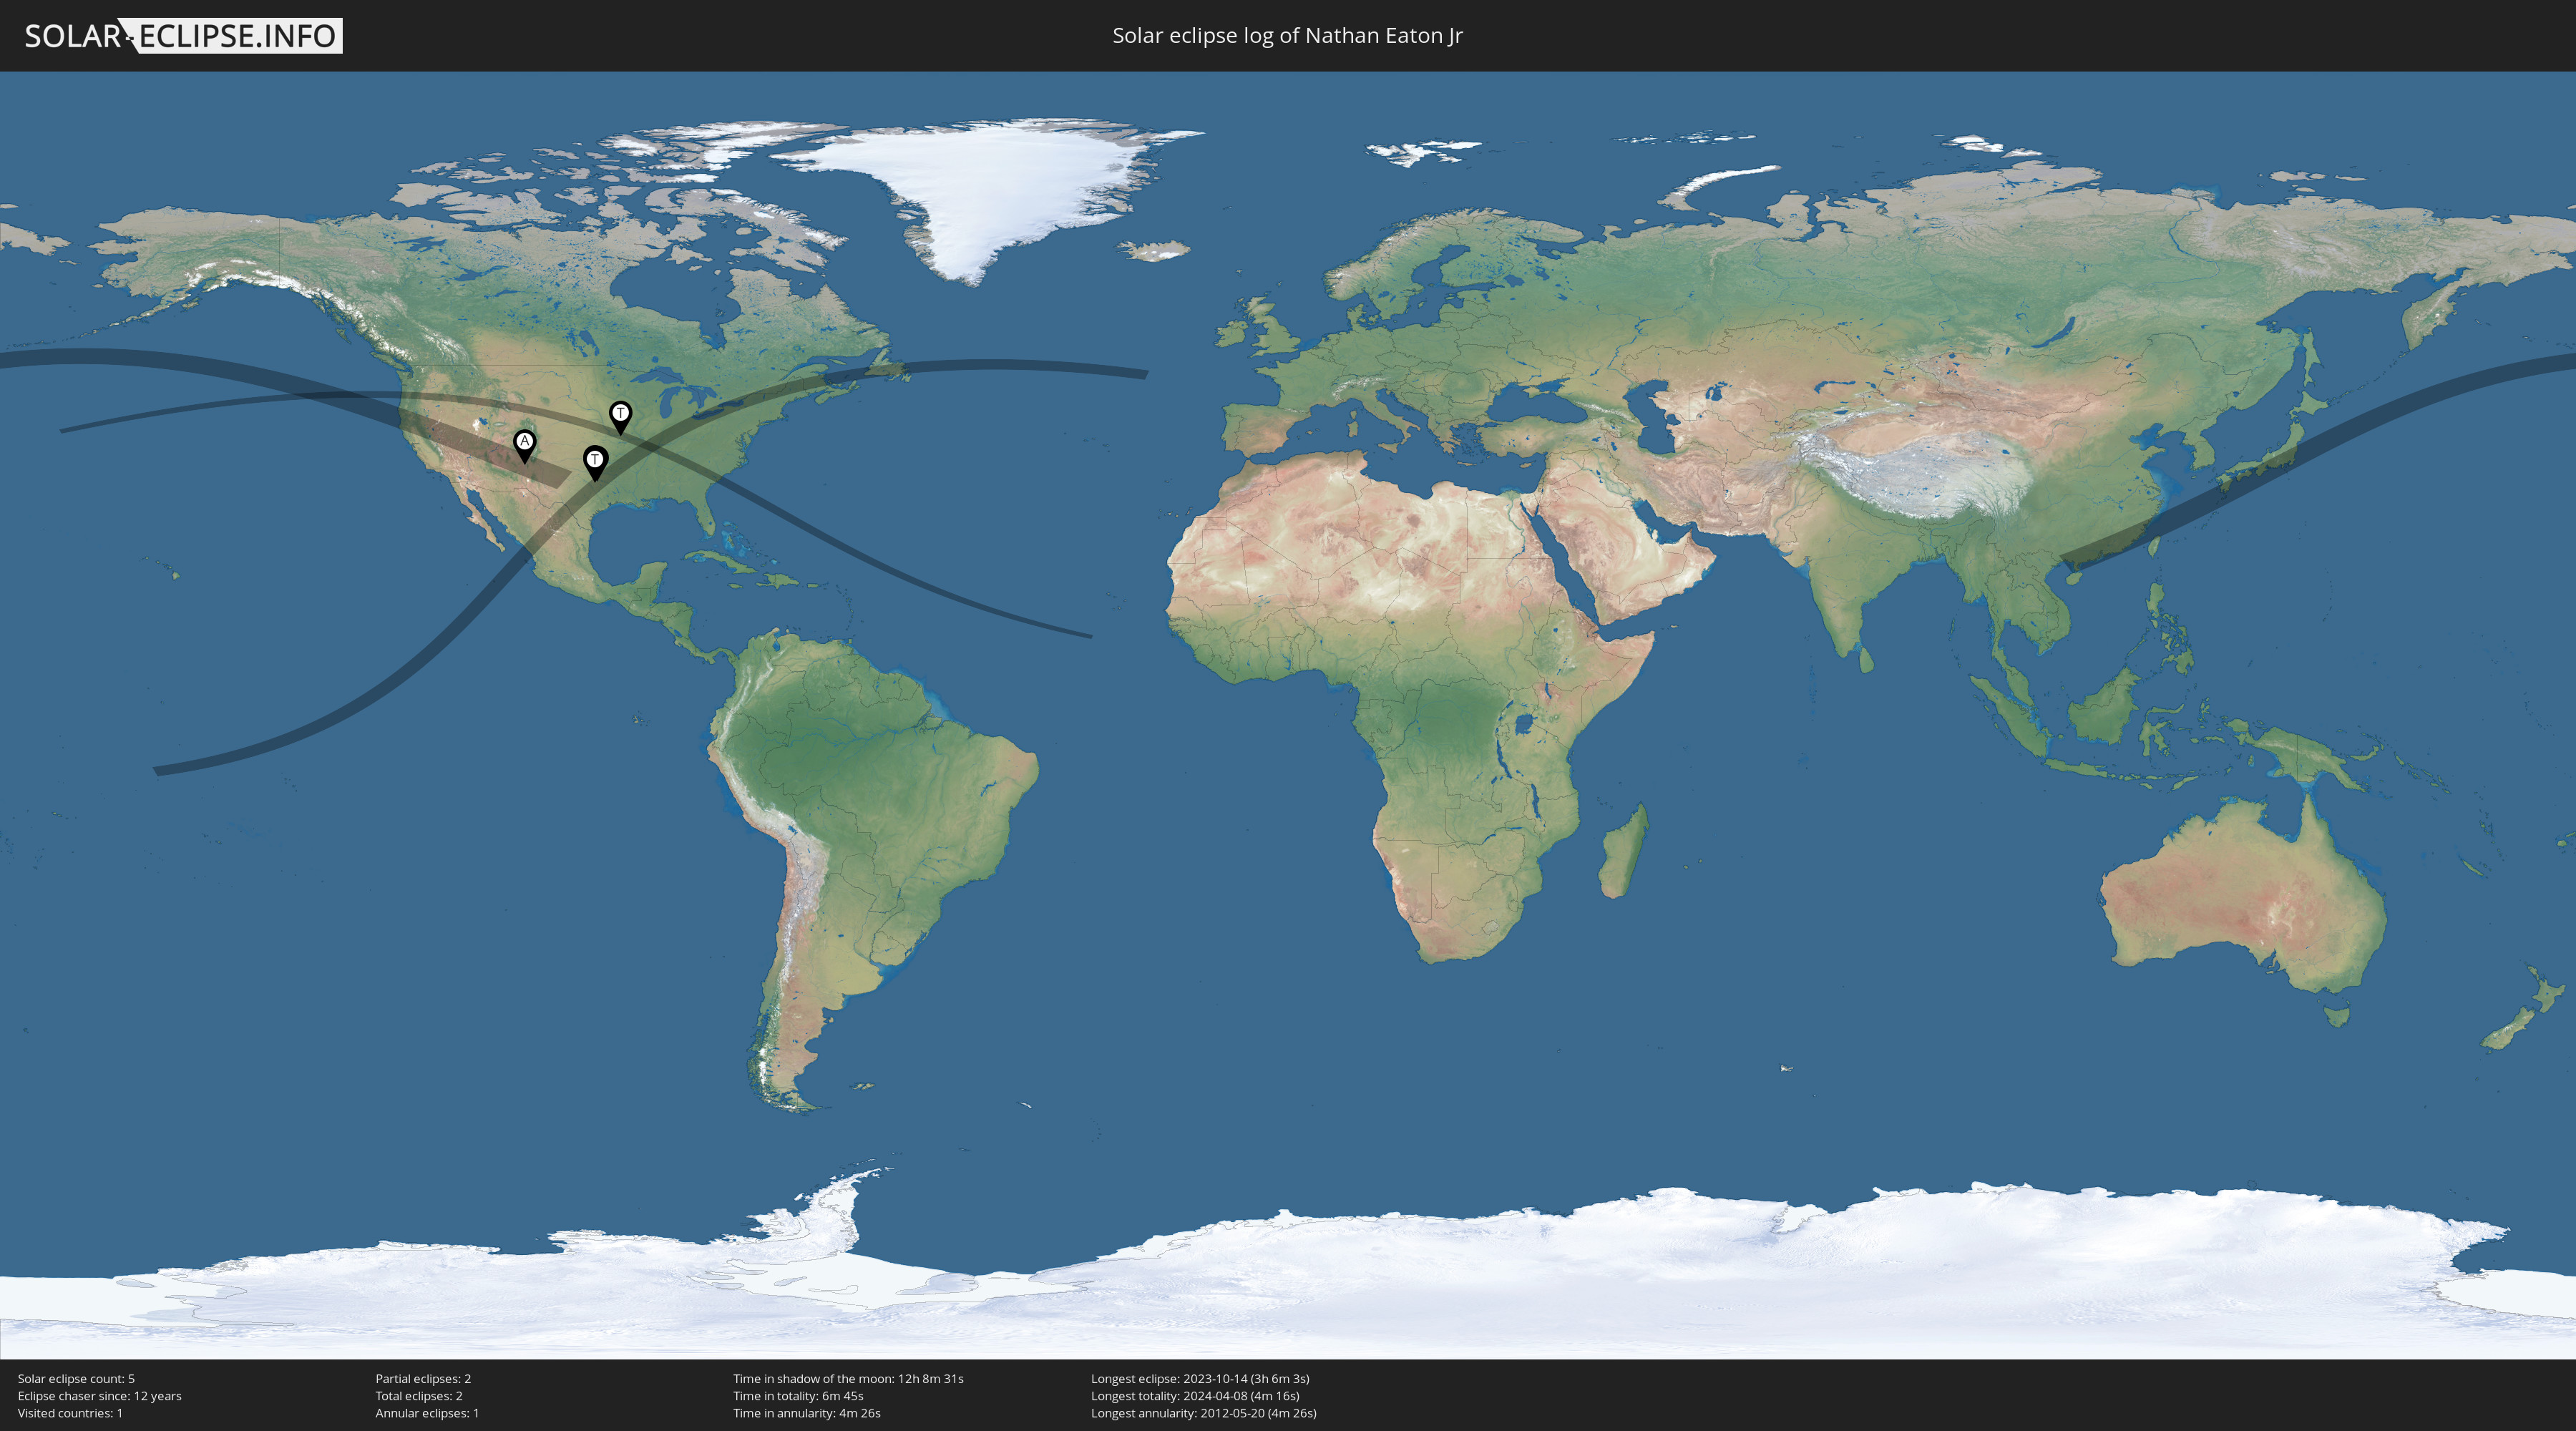
If you read my previous post on the RadioLab / IAU story of quasi-moon named Zoozve and the contest to name another quasi-moon, you may be happy to hear that the finalists have been selected and it is time to vote!
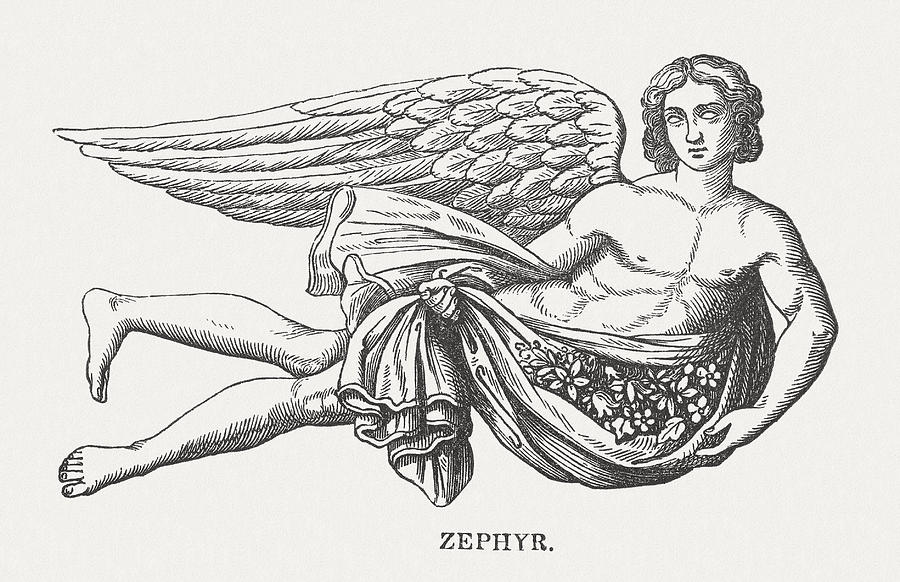
Although I thought my submission, Zephyrus, was a great name for a quasi-moon, unfortunately the panel reviewing the submissions didn't select it. But given they had over 2,700 entries to pick from, I guess my odds were pretty long anyway. 😲
Here are the names they selected as finalists:
Bakunawa - a mythical dragon from Philippine folklore
Cardea - the Roman goddess of doorways and transitions
Ehaema - the "Mother Twilight" from Estonian lore
Enkidu - the wild and noble companion from the ancient Sumerian Epic of Gilgamesh
Ótr - a shape-shifting dwarf from Norse mythology
Tarriaksuk - shadow beings of Inuit legend that mirror human forms yet dwell in another dimension
Tecciztecatl - an Aztec lunar god who once aspired to be the sun
Care to join me in voting for one of these 7 to be selected as the formal name of quasi-moon currently known as (164207) 2004 GU9? We have until January 1st, 2025. You can cast your vote here!
A friend, Michael, recently shared a post on Facebook from the account History pictures about drafting in the pre-CAD days. It brought back a rush of memories I hadn’t revisited in years. They were fond memories so I thought I would share it here along with some thoughts for the future.
From Square One
Michael was sharing the post because it brought back memories for him of taking drafting in 7th grade. Like Michael, my journey with technical drawing started in school. I took a semester of Drafting in my senior year. Not only did I enjoy the class, but it created a new connection with my Dad.
Although his job as a telephone switching office manager didn't involve drafting, he had taken classes at technical school that involved creating electrical diagrams. He passed down his drafting square and mechanical pencils to me - and I still have that square today!
After high school and a year of college, I joined the U.S. Navy, though that's a story for another time. After the Navy, I had dreams of becoming an architect. While full-time college wasn't financially feasible, and pursuing an architecture degree part-time wasn't practical, I found a middle ground after we returned to Texas: going back to Eastfield College. Taking evening classes while working during the day, I pursued an Associate Degree in Drafting & Design. Here are some examples of some of my schoolwork.
At Eastfield, I did a good bit of hand drafting but I also studied computer aided drafting and design (CADD) systems. Eastfield had a ComputerVision system called CADDS that was my first experience with drafting with computers and only the second time I had worked with a computer (the first being a semester-long introductory class in high school). CADDS was a complex beast with a steep learning curve, at least for someone new to the technology. Our teacher had war stories of working on the prior generations of CADD systems where he had to create designs using punch cards. I'm glad that was before my time!
What was new and upcoming, though? AutoCAD. Eastfield had set up a small lab with a handful of PCs running MS-DOS and AutoCAD. It was an exciting advancement, even in its early versions. AutoCAD is what really got me excited about CADD. I left drafting and CADD behind professionally almost 35 years ago, but these days I still use AutoDesk software: I've created or modified several designs using the free version of Fusion 360 for objects to create with a 3D printer.
Early version of AutoCAD
Current version of Fusion 360
Breaking New Ground
My degree gave me the foundation I needed to start working in CADD professionally, and one remarkable connection opened the right door. Thanks to Mom's close friend Virginia Helton, PE, I landed a position at the Texas Department of Highways and Public Transportation (now TxDOT) as a CADD technician. Virginia's story was pioneering – when she received her engineering license, she was one of only three women among 700 civil engineers in Texas. By the time I joined the Highway Department, the gender balance was slowly improving but still had a long way to go. Although I never worked directly with Virginia, her role in launching my CADD career gave me a deep appreciation for those who break barriers and help others follow.
Once I joined the Highway Department, I felt like I had joined the big leagues. They used CADD systems from Intergraph. From its early days creating software for missile guidance systems for NASA, Intergraph had grown to a major provider of CADD hardware and software. The Texas Highway Department was an early adopter of Intergraph CADD workstations due to the company's advances in mapping technology, a key function for civil engineering.
The Intergraph workstation I used was large, with two monitors, a large digitizing table, a puck (like a wheel-less mouse) and a keyboard. It ran software called Interactive Graphics and Design System (IGDS). Under the monitors was a large cabinet that had the local computing hardware. The workstation was connected to a Digital Equipment Corporation (DEC) VAX 11/785 minicomputer located in the regional data center across the parking lot.
Projects That Left Their Mark
In some cases I was taking working notes from an engineer and creating a set of engineering drawings (eventually to be printed as blueprints) and in other cases I was taking older, hand-drawn designs and copying them into the computer to be referenced or updated (essentially, laying them out on the digitizing table and tracing them with the CADD system). I don't recall everything I worked on - some were small projects and some were large - but a few stuck with me.
Have you ever driven under SH114 on O'Connor Blvd in Los Colinas? I drew the civil engineering designs for the update done to that interchange in the mid-80s.
Remember what Central Expressway was like before the major expansion in the 90s? Much of the actual engineering work on that project was subcontracted out to commercial engineering firms but the right of way maps, the plans that showed where we could build, were done by the Highway Department. Towards the end of my 5 years with the Highway Department, I'd moved to the Right of Way Division. Although the engineer who brought me over did so because of my growing reputation for having (self-taught) programming skills, I still had drafting duties, one of which involved working on the new right of way maps for the Central Expressway.
Back to the Drawing Board
While my day job at the Highway Department involved computer-aided design, my drafting pencils weren't gathering dust. I landed an interesting freelance opportunity that would put my hand-drafting skills to work. The project involved creating architectural design drawings for a large house in Garland - one with its own interesting story. The original owner, a guy I was told had a string of dry cleaning businesses and a large family, had commissioned the house but then ended up going into bankruptcy. The bank took possession of the house and hired a general contractor to finish it and get it sold.
A lifelong friend Neil Kirkpatrick, who had the contract to build the backyard fences, referred me to the general contractor who wanted to use architectural sketches instead of photos in the marketing materials. I visited the house several times and worked with the original blueprints and my site notes to create the drawings. At the time, I was a little frustrated that they wanted everything done by hand instead of using CADD but looking back it was a long, hard project that was very rewarding (at least in terms of personal satisfaction - I don't recall what I got paid but it wasn't all that much).
Sketching the Future
A lot has changed in the last 40 years. My journey from mechanical pencils to massive CADD workstations to lightweight design software like Fusion 360 mirrors the broader evolution of technical drawing. But even those advances seem incremental compared to what's happening now – consider the image at the top of this blog, which wasn't drawn by hand or even designed with software, but generated by AI. While we can't yet speak designs into existence through CADD systems, that future feels surprisingly close.
Is that a bad thing? I'll leave each of you to decide that for yourselves. But after four decades in technology, including my transition from drafter to programmer to architect, I can offer two perspectives.
First, my transition from CADD technician to programmer was driven by a realization: as much as I enjoyed the creative outlet of drafting, I was beginning to feel like I was just translating others' ideas rather than creating my own. I wanted to be the person responsible for the real innovation, which led me to software development and technology architecture. Had I not aspired to move into a creator role, technological evolution might have eventually eliminated my position entirely, as happened to many who were content in their existing roles. This mirrors a larger shift we've seen - just as word processing eventually led to business people writing their own materials instead of dictating to secretaries, computer aided design has evolved to where engineers can directly translate their vision into reality.
Second, I recall what a senior engineer at the Highway Department told me about CADD adoption. He noted that while computers didn't necessarily help them create better engineering drawings than by hand, they could iterate designs so quickly that in the time it previously took to do a hand-drawn version, they could refine a design multiple times - resulting in more efficient, safer, and more cost-effective solutions.
These transformative forces - the democratization of tools and the acceleration of iteration - are now being amplified by AI in ways we're just beginning to understand. The AI image in the header of this blog hints at what's coming. While we might not yet fully design via conversation, it may be just around the corner. And when it arrives, instead of replacing creativity it will hopefully remove barriers between imagination and implementation, just as past advances have done.
Postscripts
For those of you who aren't familiar with computer-aided graphics, you may be wondering "what's CAD vs. CADD"? Computer Aided Design (CAD) is a more generalized term for the technology and function. Computer Aided Drafting and Design (CADD) really harkens back to the days I've discussed above when draftsmen (and women) transcribed the work of an engineer into drawings.
For those of you who are fans of the British comedy from the 70s, Monty Python's Flying Circus, you will have caught that besides the title of this post highlighting it is a departure from the topics I usually cover here, it is also the catch phrase from this classic show. To close out, here is the trailer from the film of the same title.
If you've taken a photo of the night sky, whether with a camera or your phone, you may find it contains a few unexpected streaks. Think you captured a meteor? Or that comet you've read about in the news lately? While it could be one of those, it might also be something else.
People post questions about this so often in places like Facebook that I wrote about it last year. Now, I'm posting an update, focusing on how to quickly identify what you've captured; the details of why are in the earlier post.
Length?
First, how long was your exposure? If it was just a few seconds or even a fraction of a second, any streak will be relatively short, and its length may not be much help in identifying what caused it. However, if it was a long exposure—5 seconds, 10, or even longer—a short streak may be a meteor as they only last a fraction of a second, but a long streak is more likely an airplane or a satellite.
Dots?
Next, is the streak solid, or is it a line with dots? If there are dots, it is most likely an airplane. If there are multiple parallel lines with dots, the aircraft is flying at a relatively low altitude.
Shape?
No dots? What do the ends look like? If both ends are blunt, then what you've captured is most likely a satellite. Larger satellites (like the ISS) will leave a thicker trail. If only one end is blunt but the other is tapered, or both ends are tapered, you might have caught a satellite passing in or out of Earth's shadow, fading into or out of view.
Meteors generally also have tapered ends though usually starting very thin, getting gradually thicker and then quickly coming to a point at the end of its journey.
Frames?
If you took multiple, successive photos and the streak only appears in one frame, that's another sign it is probably a meteor. If it shows up in more than one image, then it's either an airplane (any dots?) or it is a satellite.
Color?
If the streak has noticeable color, especially different colors along its length, then it is probably a meteor. With aircraft there may be colors but the streaks are a constant color and the dots generally differ in color from the streaks. With satellites, there's usually no discernible color as they just reflect sunlight.
Fuzzy?
What if the streak is not so much a line as something cloudy with a bright spot at the lower end? Then maybe you did capture that comet!
Although it may seem from most of my posts that this blog is all about astronomy, sailing is also one of my passions so it's time to talk about that for a change.
Saturday was the start of the latest round of the America's Cup, the longest running sporting event in the world. It's always been a rich man's sport, seeing who can build the biggest, fastest boat. The defender this time is Emirates Team New Zealand and they are battling the challenger, Ineos Britannia who beat out 4 other teams (including American Magic) for the privilege. Although the regatta is usually sailed on home waters of the defender, for 2024 New Zealand opted to have the racing held in Barcelona, Spain.
This time, the "biggest, fastest boats" are the AC75, a 75 foot long foiling sailboat built to sail up to 50 knots (58mph). Actual speeds have been clocked at 55.5 knots (63.9mph)! They have crews of 8 and that includes 4 "cyclors", guys pedaling on equipment like a stationary bike to provide all the power required to operate the boat.
Starting in the 2013 edition (raced on San Francisco Bay with AC72s, wind-sailed foiling catamarans), the America's Cup introduced cutting-edge technology originally developed for football broadcasts. Using special cameras with precision positioning, they can now digitally draw the race course on screen. Remember the first time you watched a football game and noticed the down line seemingly painted on the field, yet players could walk in front of it? Since 2013, this same tech has been applied to the America's Cup, growing more sophisticated with each edition.
Watch this 1 minute clip from the Louis Vuitton challenger series, featuring Great Britain racing against Italy whom they later defeated for the right to face New Zealand. It showcases what makes the America's Cup so captivating: the speed and size of the boats, the mind-boggling sight of sailboats flying across water at near-freeway speeds, the intense competition and tactics, and even the digital augmentation. The latter is used to illustrate how the wind coming off the sails of the lead boat creates "disturbed air," which the tailing boat tacks (turns) to avoid.
While this is worlds apart from the typical sailing we do on Dallas lakes, the America's Cup has long held a fascination for me!
Comet C/2023 A3 Tsuchinshan-ATLAS, having swung around the sun and headed to the outer reaches of the solar system, is now climbing higher in our evening sky each night. Today marks its closest approach to Earth, so I went out to capture it.
I took this shot from the east shore of White Rock Lake, with the old Pump Station and its distinctive smokestack in view. Despite A3's brightness, it's a challenge to spot in urban areas without optical aids. Even with my Nikon D750, while the coma is easily visible, the tail remains quite faint.
Over the next week, the comet will rise higher above the horizon's haze, improving visibility. However, it's a double-edged sword - as it climbs, it will also retreat from Earth, gradually dimming until it's only visible through a telescope.
I'm planning another attempt in a few days, hoping to capture a better shot of that elusive tail. If you're interested in catching a glimpse of this cosmic visitor, find a spot with a clear western horizon in the hour after sunset between now and the end of the month. It's worth the effort!
Want a Zoozve Poster? Click on the image to buy one from Alex
What's a Quasi-moon
Right? What the heck are they? A quasi-moon of a planet is an asteroid that remains in the general vicinity of its planet. Unlike a moon, a quasi-moon doesn't orbit the planet itself but orbits the Sun, just with a path similar to that of the planet. If you want to learn more about quasi-moons, check out the Wikipedia quasi-satellite article.
BTW, if you have seen the latest news reports about Earth having a mini-moon for two months as asteroid 2024 PT5 is captured by Earth's gravity, you might wonder about the difference between a mini-moon and a quasi-moon. See the Wikipedia quasi-satellite and temporary satellite articles for the details but basically quasi-moons have a (mostly) stable orbit and mini-moons don't.
The Zoozve Story
I first learned about quasi-moons listening to a viral podcast episode about something called Zoozve. You should check out the Zoozve episode yourself, both for the full story and more details on this unique object, but the gist of it is that the co-host of Radiolab, Latif Nasser, was looking over a solar system poster bought for his son and noticed the name Zoozve, shown as a moon of Venus. Having never heard that Venus has a moon, he did his thing as an investigative reporter and learned that it was a quasi-moon. He also discovered that Alex Foster, the graphic artist who created the poster, had mistakenly shown the object's provisional designation, 2002VE (technically, 2002 VE68) on the poster as ZOOZVE. Latif eventually pitched the idea of submitting the name Zoozve as the official name of 2002 VE68 to Brian Skiff, the scientist who had discovered it. Brian submitted the name to the International Astronomical Union (IAU), the scientific body responsible for governing the names of astronomical objects, and it was eventually approved.
The Naming Contest
Orbital path for 2004 GU9 Click to enlarge
Inspired by the naming of Zoozve, Radiolab and the IAU kicked off a contest this past May to name one of Earth's quasi-moons, the asteroid 164207 (2004 GU9), as a way for the public to learn more about quasi-moons and the ways in which the naming process connects culture and science. You can read more about the contest here. There aren't many quasi-moons and only a few have official names, the rest just have a provisional designation, so it is pretty cool for the public to have an opportunity to suggest the name for one.
The deadline for submissions is today so if you weren't already aware of the contest, there are only hours left if you want to make a submission. However, you can still participate as Radiolab and IAU will pick 10 finalists in October and then during November and December the public will be able to vote on which of these they think will be the best name for 2004 GU9. The winning name will be announced in January, 2025.
Getting Involved
As an amateur astronomer and STEAM advocate, the opportunity to be involved in naming an astronomical object really intrigued me. I've spent time off and on over the past few months working on this. First I had to come up with a name. It had to be from a mythological source (excluding types of names used for things like planets) and it couldn't have already been used as the name of another celestial object. The name I selected is Zephyrus.
After coming up with the name, I had to draft a citation, the official description that will be recorded with the name, and a justification, my case for why they should choose my submission. Drafting those involved numerous rewrites. In the course of this I did leverage some online resources, even using AI for idea generation and suggestions on improving the writing, but ultimately the end result is my own work. See below for what I submitted.
Name:
Zephyrus
Source:
Greek Mythology
Citation:
Zephyrus is the Greek god of the west wind, one of the four Anemoi, the wind gods. He symbolizes renewal, life, and the gentle forces of nature. This name was selected through a contest organized by the IAU and Radiolab to name a quasi-moon of Earth.
Rationale:
Zephyrus, one of the four Anemoi of Greek mythology, was the god of the West wind. Although generally associated with gentle breezes, Zephyrus also had a wilder side, sometimes referred to as stormy or ill-tempered. This dual nature, a balance between gentle influence and untamed power, is also reflected in the unique orbital properties of quasi-moon 2004 GU9. Its orbital path has a subtle grace and beauty yet represents possible danger, reflected in its classification as a Potentially Hazardous Asteroid.
2004 GU9 is held in its orbit by the Sun, echoing Zephyrus' struggle with Apollo, the Sun god. Both the wind god and the asteroid have been subject to the pull of a more powerful force. Just as Apollo won the affections of Spartan prince Hyacinthus over Zephyrus, the Sun dominates the movements of 2004 GU9. These parallels illustrate a delicate balance between autonomy and influence, where smaller entities make their way under the sway of greater powers. Both cases reflect struggle and equilibrium.
Choosing the name Zephyrus for quasi-moon 2004 GU9 would pay tribute to the complexity and balance of Earth’s winds and of the movements of cosmic bodies. It would also honor the imaginative spirit of this naming contest. Just as the naming of quasi-moon Zoozve was the result of a creative spark flowing from discovery, Zephyrus is often associated with spring and growth, with the creation of the new.
If you're interested in learning more about Zephyrus, you can check out the Olympioi or Wikipedia articles on him for additional information.
Hopefully, my submission is selected as one of the finalists. If it does, I'll do a follow-up post with information on how to vote. I hope you'll consider voting for Zephyrus!
Whether or not Zephyrus ends up being chosen, it's exciting to be part of this naming process.
I'd love to hear if you have an idea for a name for 2004 GU9, have feedback on Zephyrus as a name for it, if you have questions or comments on quasi-moons or if you have questions about how and why astronomical objects are named. Drop a note in the comments - let's chat!
On a recent trip to Vancouver Island, staying on the coast of the Georgia Strait in Union Bay, we had a few days of crystal clear weather. On one of those nights I decided to try taking a star trail shot. Rather than taking one long exposure (as with film), my plan was to shoot multiple short exposures and merge them in post processing. Although the sky over the Georgia Strait is relatively dark (Bortle Scale 3), the Moon was nearly full so I followed the techniques outlined in this article about shooting star trails in light polluted skies.
I set up my Nikon D750 and Irix 15mm lens in the backyard of our Airbnb, did some test shots, started the camera intervalometer and went to bed. About 6:30 in the morning, the sunlight streaming into the bedroom woke me and I decided to bring the camera inside before going back to bed. I was a little surprised the camera was still shooting as I'd started it before midnight and had assumed the battery would have died after 4 or 5 hours.
When I took a look at the images captured that night, naturally the ones towards the end were all over-exposed; sunrise had been at 5:12AM. However, I also noticed that the sky never really got fully dark in any of the images. Consulting PhotoPills, it turns out that astronomical twilight that evening was from 11:18PM through 12:01AM and astronomical twilight the next morning was from 11:59PM the previous evening through 3:25AM. In other words, there was never a time when it was truly night (the time between twilights). Being located at almost 50 degrees north latitude and as it was a day before the summer solstice, summer nights there are really short!
This image is my first pass at post-processing and only covers about an hour and 45 minutes. Even still, it took about 4 hours of work to go through the images removing light trails from airplanes and satellites. I have more images to process, at least through 3:25AM (the start of nautical twilight) but besides having a higher number of airplane and satellite trails to edit out, those images also have a lot of ferry traffic on the strait, leaving long bright streaks of light along the waterline. I'll eventually work on those but for now I'm satisfied with what I have done so far.
As you can see, shooting directly out over the strait involved having the camera aimed just a little east of due north. The small arc in the center of all the other concentric arcs is the star Polaris, the North Star. The brighter star trails around it are from stars in constellations like Cassiopeia, Cepheus, Perseus and Cygnus. If you look closely, you'll see some color variations; not all the stars are white.
One light streak I left in that isn't a star trail is on the far right. Blogger doesn't provide a way for you to zoom in but if you could you'd see a small meteor, a shooting star.
Enjoy! Be sure to click on the image to see enlarged.
Update: I've replaced the original image with a revised edit in which I blended a single foreground image for a more natural appearance.
Some news headlines leading up to the total solar eclipse last week suggested we might be able to see the "Devil Comet" (12P/Pons-Brooks) during totality, though with binoculars or a telescope, not naked-eye. We didn't see it but then we even forgot to use our binoculars to look at the eclipsed sun during totality much less remembered to use them to look for the comet.
I was asked whether the comet might appear in the photos I was taking with my telescope and my answer was, unfortunately no, it was well outside the field of view of my equipment.
However, I was excited to see an article in my news feed late last night describing a comet passing close enough to the sun to fit in a telescopic field of view. Called SOHO-5008, it was a sungrazer, a comet passing so close to the Sun it would appear in coronagraph images by the SOHO solar satellite. This one had been identified in SOHO images the morning of the eclipse and several people found that they had captured it in their eclipse images. Later that day, it had burned up in the Sun.
This morning, I pulled up my own images from totality and found that I had captured it, too! It took bumping up the exposure far more than I usually would but, once I did that and made a few other adjustments to bring out more detail, there it was. Here is an edit with labels similar to an image from my last post, noting some of the brighter stars visible from constellation Pisces and adding an enlarged inset for the comet.
I may do another edit later on to balance out the overall image but i wanted to go ahead and share this now.
I went down a bit of a rabbit hole this week, assuming that to really get sharp detailed images of totality I needed to go through the rather involved process of using calibration frames to process all of the images I planned to stack before trying to stack, register and merge them. After spending a few evenings starting down that road, I took a break and in reviewing tutorials on processing solar eclipse images I ran across several that describe doing everything directly in Photoshop without the use of registration frames.
Following the process described in this Sky & Telescope article, I created the image above using a set of images shot at 2 stop intervals from 1/4000th of a second to 1 second, all shot at f/5 and ISO 100 with my Nikon D750 through our Sky Watcher Evostar 72ED telescope.
Click on it to enlarge and check out the incredible detail. You'll find features like:
Plenty of detail in the solar corona
Solar prominences
The lunar surface illuminated with light reflected from Earth (Earthshine)
Several stars from the constellation Pisces
This is just the first phase of edits described in the article so more to come. In the meantime, I did a separate version with features labeled.
As described in a previous post, I assembled a Sun Funnel to use on our Parks 60mm refractor with the tracking motor running to keep the Sun in the field of view as it across the sky during the April 8th total solar eclipse.
Our family members who gathered to watch the eclipse enjoyed having an alternative to staring at the Sun through eclipse glasses. It worked great!
In this clip, you can see the partially eclipsed Sun, a sunspot and even clouds drifting by.
One of my primary goals for this total solar eclipse was to capture a variety of telescopic views of the eclipse. The similar goal I had in 2017 was spoiled by overcast skies that resulted in a mad dash down the road with Beau Hartwig chasing clear skies. Seeing totality with my own eyes meant giving up on my photographic goal. I don't regret that for a minute but I was thrilled that this time the skies cleared for us just in time for the "Big Show".
To avoid having to split my attention between experiencing totality and taking pictures, I used our old 2012 MacBook Pro running a software package called Solar Eclipse Maestro to control the camera, snapping pictures at pre-defined times and exposure settings. SEM worked flawlessly and had it not been for a user-error on my part (which I'll cover in a future post), I would have captured everything I planned for. As it is, I still was able to capture most of what I planned including:
Diamond Ring effect (though not as spectacular as that from other people due to my snafu)
Although the images captured were as good or better than I hoped, post-processing them to fully bring out the available detail is a rather complicated thing involving a variety of software tools. I am still working on that but I wanted to go ahead and share some initial edits.
The image above is a blend of each of the 19 different shutter speeds used to capture images to submit to the Eclipse Megamovie project. They were taken during totality to capture as much fine detail of the solar corona as possible. The project team will use the calibration frames to pull out even more detail than appears in this image but, for my first pass at this I used some basic stacking techniques in Photoshop. Click on it to see enlarged... isn't the level of detail incredible?
I'm also including some cursory edits I've done of a few other images below including a partial phase image and a picture of Baily's Beads. What I am the most excited about though is the spectacular solar prominences that appear in the Baily's Beads shot. Wow! Even more incredible is that the largest one was visible naked-eye.
Once I've had time to go through the rest of my images and finish some of the more complicated editing processes, I'll share more of these. I'll also do a follow-up post on my equipment and what went into capturing these images.
I hope you got a chance to see totality for yourself but, if not, please enjoy my first pass at sharing the view with you.
Late in the partial phase of the eclipse. Note the sunspot in the center!
UPDATE: Now that I've had time to work on some of my other images and videos, I went back and remixed this one to fix some things I rushed the first time around. In this edit the sky appears darker, closer to what we saw that day, so the coronal ring around the Sun stands out better.
Another total solar eclipse imaging projects I planned to do is a timelapse sequence of the eclipse. In 2017 I tried shooting the entire eclipse but this time I just focused on the 5 minutes before totality, the 4+ minutes of totality and the 5 minutes after. Unlike 2017, we had much clearer skies and this came out pretty much just as I planned. Thanks to Alan Dyer (amazingsky.net) for the tips in his book on shooting the eclipse, specifically the tips on shooting a wide-angle timelapse!
To capture this, I set up my son Brian's Nikon D750 with our Irix 15mm f/2.4 wide-angle lens on a tripod at the corner of my son Chris' yard where we were observing the eclipse. My D750 was in use on the telescope so a big thanks to Brian for the use of his camera!
The sequence was shot with the internal intervalometer set to capture an image every second for 15 minutes with the timer set to start it at 1:35pm so that I didn't have to remember to start it on time. I set exposure ramping on so the camera would automatically adjust the exposure as the sky got darker and brighter, then set the exposure compensation to +1.33 so that it wouldn't be heavily overexposed during the pre- and post-totality shots.
Once at home, I processed the 900 images in LRTimeLapse and Lightroom Classic to create a video clip from the images and then added titles, adjusted track speed and added music in DaVinci Resolve. This is the finished product!
A few things to watch for in the video:
At about the 18 second mark, look for the small star to lower right of the Sun. That's not a star, it is the planet Venus!
The contrail at lower center is probably a commercial aircraft, possibly one of the one flying along the eclipse path to prolong how long they could watch totality.
At about the 36 second mark, the "insect" flittering about above us in the drone landing after shooting the arrival and departure of the lunar umbra.
As I shared in an earlier post, one of the many projects I planned for the total solar eclipse involved doing data collection with a variety of sensors based on ESP32 microcontrollers. I haven't done any detailed analysis of the results yet but based on a quick review of some of the sensor data there are clear changes that are in line with what I expected.
First up is the ambient air temperature measured with a BME280 sensor for temperature, relative humidity and air pressure.
The air temperature certainly dropped which makes sense given the gradual and then sudden drop in UV sunlight. Interestingly, the drop lagged the eclipse by about 15 minutes with totality starting at 1:40pm local time and the lowest temperature being reached at about 1:55pm. The higher temperature in towards the end of the eclipse makes a little sense given before totality had been mostly cloudy and after totality was mostly clear. I am not yet sure what explains the dip at 2:55 or the temperature reaching over 110 at the end of the eclipse. It wasn't that hot where we were so I have some research to do.
For air pressure, it appears there was a general trend down. Obviously, air pressure changes are related to broader atmospheric conditions. I suspect I needed to have data from a much longer period before and after the eclipse to have any chance of seeing any form of correlation.
As relative humidity generally has an inverse relationship to temperature (though it can be influenced by other factors), these results are what I would have expected.
Next up is light level measurements. I used two sensors, an AS7341 color spectrum sensor and a TSL2591, a light level sensor. The AS7341 data will take more analysis to make sense of though it does show light levels in all frequencies it measures dropped to nearly zero during totality. The light levels in lux from the TSL2591 are pretty easy to understand.
This completely aligns with totality which in the location in Ellis County, Texas, where we were started at 1:40pm and ended 4 minutes 16 seconds later. The left side of the graph makes sense as it was mostly overcast with the Sun occasionally poking through in the period prior to totality, hence the graph peaks and valleys before 1:40pm. The right side of the graph also makes sense. It was generally clear for about an hour after totality but with it turning partly cloudy again in the last half hour. Unlike the start of the eclipse, it was mostly clear skies with large clouds blocking the sun here and there.
Although this is all very preliminary, just taking a glance at data results via the Home Assistant UI, these seem very much in line with changes expected during a total solar eclipse. If I find other meaningful results as I get time to do a more detailed analysis, particularly the sound level data and the color spectrum data, I'll post that, too. \
Click on a graph to see them enlarged.
PS. As I expected, the magnetometer data collected with a QMC5883L doesn't appear to show any magnetic field changes that might correlate to the eclipse. I'll leave that science to the professionals!
This is a aerial view of the arrival and departure of the Moon's shadow, the lunar umbra, over Ellis County Texas during the total solar eclipse on April 8th, 2024.
We launched the drone just ahead of totality programmed to hover till the arrival of the lunar umbra and then orbit to film the horizon during totality.
The sky got darker than I remembered from the 2017 total solar eclipse but the way things looked as the umbra arrived, growing darker first from one direction, and then as it departed, growing light first from the direction it had arrived, was the same as to 2017.
Thankfully, we had relatively clear skies but the effect would have been similar even if it had been completely overcast. I had hoped that as the drone orbited it would capture the full 360 degree sunset effect along the horizon but it was too cloudy. You can get just a sense of it at the 58 second mark in the video.
The total phase of the eclipse at this location was 4 minutes 16 seconds. However, as the focus for this video is on the visual experience of the sky getting dark with the arrival of the umbra and growing light again with its departure, the duration of totality is edited down to about 22 seconds. As the Sun was about 65 degrees above the horizon, it was not possible to include the eclipsed solar disk in this video.
PS.
After posting this, I ran across a similar drone video from 2017 that doesn't show the lunar umbra arrival and departure but it does show the 360 degree sunset effect. Check it out here.
Details:
Filmed from a DJI Mini 2 drone using DroneLink flightplan
First of all, if you've been watching the weather forecasts, you may have concluded that the total solar eclipse passing through Dallas on Monday will be a bust. Well, don't give up hope, yet. Even though we got clouded out in 2017 on our trip to Marshall, Missouri, as you would see in my post from back then, I still managed to capture of view of totality through the clouds. All it takes is for the clouds to part a bit at just the right time or the clouds to be high altitude and thin for us to still be able to see totality. Regardless of the forecast, be sure to get outside to see what there is to see!
Even if we are clouded out, you'll still experience one aspect of a total solar eclipse: it will get dark! With that in mind, I expect to have a successful day whether I get to see the total eclipse or not. I have a bunch of microcontrollers (ESP32) with sensors that I'll be using to collect data that day.
That said, you may find that my approach to data collection is a bit unorthodox. Here's part of my setup for data collection. Yes, that is a Nonni's biscotti box. :-D
Seriously, here's the type of data I'll be collecting:
- light levels for visible light and near infrared (lux)
The architecture I'm using builds on infrastructure I already have in place. I use Home Assistant running on a Raspberry Pi for my home automation, control and historical data. Home Assistant supports integrating data sensors using microcontrollers called an ESP32 via a system called ESPHOME. By attaching various sensor components to an ESP32 then configuring it in ESPHOME, it makes it simple to automatically collect sensor data in Home Assistant for storage, retrieval, monitoring and analysis.
Here is an example of a historical data graph in Home Assistant. The beauty of this besides being able to quickly visualize data is that Home Assistant also makes it easy to download the data for analysis in other tools.
My original plan was to set things up to collect data through three full days, the day before, of and after the eclipse. Given the prospect of clouds and, more importantly, the forecast for rain on Tuesday, I've scaled back to just trying to collect data in the hours around the eclipse. I considered creating weatherproof enclosures for the sensors but that would have turned a shoestring-budget project into something quite a bit more expensive.
After things have wrapped up, I'll pull up history for all the sensor devices in Home Assistant and download the data for further analysis.
As for the details of the sensors I'm planning to deploy, let's start with the light sensors. You can see details of the code plus the specific sensors in this gist on github.com. For this sensor package, the ESP32 and the sensors are mounted on a breadboard that is in the bottom of the biscotti box.
The reason is that my goal is to measure changes in ambient light. For various (and technical) reasons, direct sunlight would be more challenging to measure with these sensors. Given we should see a drop in ambient light levels (and color levels) during totality even if it is cloudy, I think the data will be more predictable and meaningful just measuring ambient light. Pointing the sensors straight up and blocking them from direct sunlight should accomplish this.
One thing you'll see in the ESPHOME code for each sensor package is that they generally report data back to Home Assistant once a minute but include a switch I can turn on that tells the sensor to send measurements every second (or faster). I have Home Assistant automations set up to flip the high speed data collection switch on for each sensor package a little while before the eclipse starts and turn it back off a little while after the eclipse ends. That way once I set things up Sunday evening or Monday morning, I can focus my attention on the eclipse, leaving the data collection to happen automatically.
On one side of the outside of the box is another ESP32 mounted on a breadboard with a sensor to measure the environment. Here's the gist with the ESPHOME including details on the sensor. It will collect data on temperature, relative humidity and air pressure. The code also derives absolute humidity and dew point.
Based on things I have read including published eclipse science projects, we should certainly see a change in temperature as the Moon's umbra passes over us during totality. Relative humidity has an inverse correlation to temperature so I expect to see changes to it that are similar to the temperature changes (but inverted). I have no idea what to expect in terms of changes in absolute humidity, air pressure and dew point but it will be interesting to see if there are changes that match the timing of the eclipse.
On the other side of the box is an ESP32 with a digital microphone. This one is set up to measure changes in sound levels throughout the eclipse. You'll see in the gist, this is based on a custom ESPHOME component. It provides sound levels in several forms but my interest is in just having the unfiltered (raw) sound levels.
Measuring changes in sound levels that can correlate to the total phase of the eclipse may be challenging. Although it may "get quiet" in terms of reactions to the darkness by birds and insects, my guess is that loud expressions of joy during totality by folks gathered with us to observe the eclipse may offset any drop in sound levels by nature.
The last sensor package I've put together was an afterthought. I had one more ESP32 and also had a sensor that is a magnetometer, one that measures changes in magnetic fields in 3 axis. See this gist for the ESPHOME code which includes details of the sensor. The ESP32 I'm using in this case also happens to be much smaller than the others which seemed like to a good idea for a sensor trying to measure changes in local magnetic fields.
Based on my research, there have been changes in magnetic fields around Earth measured during past total eclipses but those measurements were performed with sophisticated equipment in the upper reaches of the atmosphere or in space. I don't have any reason to expect that I'll measure any changes that correlate to the timing of the eclipse with my simple magnetometer setup but I figure I'll do the data collection and see what happens.
For this sensor package, I've mounted the sensor on top of a wooden yardstick with the ESP32 below and a Wi-Fi antenna below that. My plan is to have this mounted on a stake well away from structures and people to minimize other magnetic fields nearby. However, that means it's further to the Wi-Fi router, hence the extra antenna. I'm also using a power pack instead of using a power adapter plugged into AC power. This means the only limitation on where I can put this will be how far from the house I get before the Wi-Fi signal drops.
Sometime next week when I have had time to review and analyze the data collected on Monday, I'll write up my conclusions and share them here.
As I shared in my last post, I was up in the very early hours this morning to catch a unique event, the International Space Station (ISS) passing in front of the Moon, a lunar transit. What I didn't share in that post is why I used the video mode on my Nikon D750 instead of taking individual photos.
The D750 is a great camera with some powerful capabilities. It has a top capture speed of 6.5 frames per second. Unfortunately, it can't sustain that speed for long. After about a dozen shots, the buffer fills up and the camera slows to closer to 1 frame per second or even 1 every two seconds. With an event that only lasts about 6 tenths of a second, since the camera only shoots at 6.5 frames per second for about 2 seconds, it would take perfect timing to be able to capture any part of the transit. If I started shooting 4 or 5 seconds too soon or too late, I might miss it all together.
However, with a video mode of 60 frames per second, I just had to start recording well before the start of the transit and then let it run long enough to be sure the transit was over before stopping the camera. Thankfully, when I was scrambling to finish focusing this morning and realized it was almost time for the transit, starting the video and letting it record for a few minutes was enough to capture the transit and capture far more frames with the ISS than I could have even if the D750 could capture images at 6.5 frames per second indefinitely. Using video has its drawbacks, e.g., things in motion (and the ISS moves incredibly fast) inherently have a little blur, even with a really fast shutter speed, but capturing more images with the ISS in them and having a bit more flexibility in starting/stopping the capture was worth it. Perhaps someday I'll get another chance to do this and will try capturing it with images instead of video.
To create the image above, I went through the video with Lightroom, selecting each frame with the ISS and exporting it as a JPEG file. I then took these files and opened them in Photoshop as levels. By using auto-align and auto-blend, Photoshop produced a single composite image showing the track the ISS took across the Moon. I decided that the first draft was a bit busy so I did it over again just using every other ISS frame to produce this photo. I also applied some intelligent sharpening to make up for the camera being a little out of focus. It's not great but I am satisfied with it.
Every few weeks I check transit-finder.com to see whether there are solar or lunar transits happening nearby. Earlier this week I found that there would be one early AM this morning.
Lots of things have to come together just right to see the ISS cross in front of the Sun or the Moon.
A location on the Earth where the ISS passes directly in between that location and the Sun or Moon.
The ISS has to be close enough to the Earth for its angular size (how big it appears in the sky) to stand out. My sources indicate it's best when the ISS has an angular size of at least 42 arc seconds.
A time of day or night when there will be enough contrast for the ISS to stand out against the given object. For the Sun, this is pretty straightforward but a transit in front of the Moon when it's up during daylight makes for a more challenging capture.
And, of course, you have to be able to see the event so that means little or no clouds.
The last few times there's been one in the area, the weather didn't cooperate but this time it was pretty clear. The location was within 15 minutes of home and the ISS was forecast to have an angular size of 59.72 arc seconds.
A little before midnight, I packed up my equipment and Luna in the car and headed to the area where Linda, Lexie and I used to take walks when we lived in Mesquite. With a tripod, mount, telescope, camera and other gear, I needed a spot where I could set up next to the car so I had to scout a few spots looking for a place without too much bright light, on public property, and with a clear view of Polaris (to align the mount) and the Moon. I finally settled on the parking lot at the Palos Verdes Lake Park. Unfortunately, that chewed up enough time that I was still trying to get a sharp focus on the Moon when I realized it was time for the transit. I went ahead and started video rolling, let it go for a few minutes and then packed things up and headed home.
Today, sitting down with the video I was thrilled to find I had captured it! The focus is not great but it is clear enough to be able to see the ISS moving across the face of the Moon. The entire event was just over a half a second so shooting at 60 fps I caught about 30 frames of the ISS.
I'm sharing the video for now. Later, I'll work on putting together a photo that captures the entire event in one image.
Be sure to watch full-screen for the best view of the transit.
In the meantime, here are the technical details:
SkyWatcher Evostar 72ED
0.85 Focal Reducer/Flattener
2X Teleconverter
Nikon D750 (DX mode)
Deep Sky Dad AF3 focusing motor
60fps video at ISO 3200 1/4000th second shutter speed
SkyWatcher Star Adventurer GTi mount
Radian Carbon Fiber tripod
Edited in DaVinci Resolve
Event details:
See transit-finder.com screenshot below. The centerline crossed the trail just north of Northwest Drive. I captured this video from the park parking lot (not shown in this diagram but it's at the northwest tip of the lake).
As I mentioned in my last post, I have a lot of irons in the fire for the April 8th 2024 total solar eclipse! One of those is all about viewing the overall eclipse: building a "Solar Funnel" or "Sun Funnel".
Our old telescope, a Parks 60mm refractor we bought about 30 years ago, happens to be on an equatorial mount and has a sidereal motor. All that means is that I can point it at something in the sky and the motor ensures that the object remains in the eyepiece (with only an occasional need to adjust the direction the telescope is aimed).
Normally, we would never point a telescope at the Sun without a solar filter but in this case it is OK: we won't be looking directly into the eyepiece. Instead what would appear in the eyepiece is projected onto a piece of rear-projection screen material, allowing us to see it safely. Better yet, more than one person can watch at the same time!
We have used a similar approach in the past, projecting the Sun onto a white piece of poster board to check out sunspots but that was kind of cumbersome. This Sun Funnel design is much easier to use.
Ironically, while the Sun Funnel does a great job of showing the solar disk including sunspots and the Moon taking a bigger and bigger "bite" out of the Sun during the partial phase of an eclipse, it won't be something we'll pay any attention to during the "Big Show"; it will be useless during totality since the Sun will have disappeared behind the Moon!
Still, the partial phase of the eclipse lasts hours compared to totality which only lasts minutes so the Sun Funnel will get a lot of use on the 8th.
If you have a small telescope (even if it doesn't have a motorized mount) and you'd like to build your own Sun Funnel, they are pretty simple to make and don't cost much, either. One of the most commonly referenced sets of instructions is this one from American Astronomical Society, Nightwise.org and NASA:
It has full instructions on building it, how to use it and details like the calculations for how to determine the right size eyepiece for using a Sun Funnel on your telescope.
I finished ours the other day but today was the first time the Sun was out long enough for me to test it. If you look closely at the second picture (click on it to see enlarged), you'll see that the bright circle in the middle is the Sun, pretty much filling the entire field of view. You'll also see a number of sunspots, several just above center and another one down at the bottom.
Whether you build your own Sun Funnel or not, I hope you will be someplace in the path of the eclipse on April 8th and wish us all "clear skies"!


.png)