Saturday, July 30, 2022

Eaton Family Solarcan Project - Phase 3: Olivia

As covered in previous posts, late last year I discovered a product called the Solarcan, a pinhole camera created using an aluminum can with a small hole in the side and photographic paper inside, all to capture long-period exposures (weeks, months, years) of the Sun as it moves across the sky each day, images called solargraphs. 

I bought a five-pack of Solarcans in December and used one to shoot a sample shot to share with my grandkids; see Phase 1 post. I gave the other four to them as Christmas gifts. 

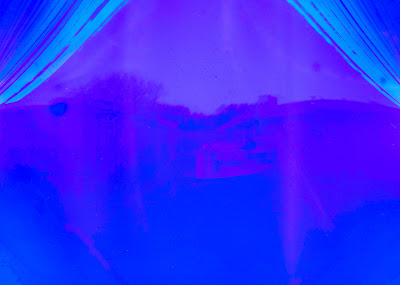
In the Phase 2 posts, I covered helping my grandkids set up their Solarcans. The plan for each one was to have them up about 6 months. For the one Olivia and I put up (see this post), it turned out we needed to take it down a little early. On July 9th, we took it down. Here is the raw scan. 

Although the arcs traced across the sky by the sun are pretty easy to make out at the top, they do look a bit weird. One reason is that this photo, captured with a camera created with a piece of photographic paper inside a can with a pinhole on the opposite side of the can, is a negative, i.e., things that are bright appear dark and vice versa. 

So, the first step in processing a Solarcan solargraph after scanning it is to convert it from a negative to a positive. From there, everything else is about getting an image in which some of the details come out (e.g., adjusting exposure and contrast) and adjusting color and other variables to get something that looks interesting. The full workflow for this is described in the Solarcan instruction booklet

With Olivia's, I played around with two different color schemes, one blue and one magenta. Olivia likes the magenta one best. Here they are. 

To get a better sense of what the foreground in these show, check out the photo of their backyard from the Phase 2 post

On the left is their fence with the neighbor's trees just beyond. On the right is their house including the chimney at the far end of the roof. In the center is their patio with furniture, a grill, etc. 

As for streaks across the top, those represent the path of the sun arcing across the sky from East to West every day during the 140 days the Solarcan was up. 

As described in the earlier post, the gaps are the result of weather, specifically clouds. Bright, sunny days left a full arc from one side the to other. Overcast days left dark arcs where bright enough sunlight didn't hit the photographic paper to leave an imprint. Partly cloudy days resulted in arcs across the solargraph with gaps here and there. 

By the way, the reason the arcs of the Sun disappear off the top of the page is just because we mounted the Solarcan vertically and as the Sun got higher in the sky during mid-day, the light from it didn't fall directly on the photographic paper. If we had mounted it angled up slightly, then we would have gotten the full path of the Sun each day. 

Next up, I'll post about developing the solargraphs for Jack and Harper's Solarcans which we took down this week. Kaili's will stay up until about Christmas. Stay tuned for more images!

As always, click on an image to view full-screen. 

Friday, July 15, 2022

July Waning Gibbous Moon

As a follow-up to the supermoon shot in my previous post, last night I spent time fine-tuning my technique for shooting the moon with the equipment I described in that post. Here is the result. 

The main difference is that for this shot I added a 2X teleconverter to increase the focal length. A longer focal length results in higher resolution for the subject, in this case, the Moon passing from full phase to gibbous phase. 

The Evostar 72ED has a focal length of 420mm. It's necessary to use the 85% focal reducer/corrector to capture images through it with a camera so that reduces the effective focal length to 357mm; that was what I used for the image in the prior post. Adding the 2X teleconverter increases the effective focal length to 714mm. The resulting higher resolution provides greater detail in this image. 

This photo is the result of stacking the 3 best of 12 shots using PlanetarySystemStacker. I then followed this tutorial to post-process the image in Lightroom Classic. While some of the improvement over the last image is due to the post-processing, I think that overall this is a much better shot thanks to using the teleconverter and spending more time getting as sharp focus as possible. 

Enjoy!

Thursday, July 14, 2022

July 2022 Supermoon

As reported on EarthSky and other sites, the full moon yesterday was the closest and brightest of 2022, fitting the definition of what is now commonly referred to as a supermoon. It was cloudy to the east when I went out to the north shore of White Rock Lake to capture it rising over Corinthian Sailing Club so initially it wasn't visible but it eventually started peaking out of the clouds, appearing very orange. Here is the shot I captured with a Nikon D750 attached to our Evostar 72ED telescope and 85% focal reducer/corrector mounted on our Sky Watcher Star Adventurer tracker. This is the result of processing 150 shots, first cropped and exposure adjusted with Lightroom Classic and then stacked with PlanetarySystemStacker to get a cleaner, sharper image.

This is a pretty crude result as I am still learning how to get optimal focus with the camera on this telescope, how to balance the tracker to improve stability and how to use the stacking software. More to come...

While I was shooting this, I had another camera taking shots for a timelapse video of the supermoon rising over the sailing club and the lake. I'll post that after I have time to work on editing and rendering it. 

Click on the image to view full screen. Enjoy!


Saturday, July 9, 2022

First (and Second) Light with New Equipment

Earlier this year, we started on the journey to replace our older telescopes, a Parks 60mm refractor (currently for sale) and an Orion 8" Dobsonian reflector, with something lighter and smaller. The new telescope is a Sky Watcher Evostar 72mm ED apochromatic refractor. It is under 18" long and only weighs a touch over 4 lb so it's very portable. On a solid mount and using our Sky Watcher Star Adventurer tracker, it makes a very nice platform for both visual and photographic views of the sky. 

The telescope itself is optimized for viewing large but dim structures like galaxies and nebulae but with the right optics it works well for wide-field views of the planets, the Moon and the Sun. Of course, for solar viewing, it takes more special equipment. As with our other telescopes, I opted for one of the more affordable solutions, a filter made of Baader solar film. I had ordered Baader film from the Baader Planetarium but I needed a holder to fit the new Evostar. Instead of creating one from scratch out of cardboard as I did for the 2017 Total Solar Eclipse, I searched online and found a design on Thingiverse. Thanks to Dari Esfahani for creating it for me on his 3D printer. 

Here are shots of the finished filter and the new telescope.


On Friday, I set up the telescope and filter in the backyard. The view was great as there is plenty of sun spot activity right now (see SpaceWeather.com). I grabbed a shot through the eyepiece with my phone as it was too hot (105°) to take the time to mount my camera on the telescope. This morning before it got so hot, I tried again with the camera mounted on the Evostar. So, here are the "first light" and "second light" shots for the new solar filter. 

Taken with Pixel 5 cell phone through 
eyepiece on Evostar 72ED

Taken with Nikon D750 mounted on
Evostar 72ED

The shot taken with my phone isn't quite as clear and it has some odd artifacts from how the phone camera processed the image but otherwise, it isn't too bad. The shot through my Nikon D750 is sharper though I was a bit rushed and I think I can get even sharper focus the next time. As for the differences in the sun spots between the two images, it is in part because the orientation of the phone camera yesterday vs. the Nikon this morning plus a small difference in the size and location of each sunspot due to the time that had elapsed between each shot. 

With the new solar filter, I'll be spending more time watching and photographing the surface of the sun. Stay tuned!

As always, click on an image to see full-screen.